I take lots of photos. If I'm in a beautiful area I may take 1-2,000 in a month. I love them all and I don't want to delete any, (that's work) but I do want to be able to find and show just my best (that's fun.)
That's what Albums are for.
Develop your own Album "system."
When I'm browsing my photos and I see one that is particularly good, I want to add it to an appropriate album. We are traveling and taking pictures all the time, so I've developed a system where I make an album for each month. I name it starting with 4 digits for the year, then a dash and 2 digits for the month. That makes them easy to search. I start an album at the beginning of the month and add photos as I go. If I want to see my best photos from July 2018, I just search for 2018-07. I also make albums for specific events.
To add a photo to an album
Open the photo on my phone
Tap the 3-dot menu in the upper right
Choose Add to Album
Scroll down the list and tap the appropriate album (note: once you have a lot of albums, you may need to scroll a ways. Albums are in date order by the most recent photo in the album. Once you've added one photo, that album will show up at the top as a Recent album the next time.)
To remove a photo from an album
If you're looking at an album and you decide that a given photo or video does not belong there:
Select or open the photo and tap the 3-dot menu in upper right
Choose Remove from Album
When prompted to confirm, tap "Remove"
If you change your mind, you can always find that photo in your Google Photos library and add it back.
Albums are our one organizing tool
Once you have your best photos in named albums, you can use the albums to share with friends. You can also create printed books from the album photos. I make albums primarily for myself, just so I can easily find my best photos from any given month or occasion. Unfortunately there is no way to sort albums yet. There is also no way to categorize albums, for example by work or travel. Hopefully these are features that will be added sometime.
I just click on the Album tab in my Google Photos app and I can scroll to an album I want, or if I don't see it right away, I can search. As soon as you start typing a search term, the top Autocomplete suggestions will be albums, if you have any matches. Get familiar with the icon that signifies album:
To learn more, see Chapter 7 in Mrs. Geek's Guide to Google Photos. Also try going to GeeksOnTour.com and use the search feature at the top right to search for albums. You will find a wealth of material there! Some is free, some is for members only.
If you've never used albums before - start now!
Chris Guld is President and Teacher-in-Chief at GeeksOnTour.com. She has been in computer training and support since 1983. She is now a Top Contributor for the Google Photos Forum, owner of the LearnGooglePhotos.com blog, and author of Mrs. Geek's Guide to Google Photos. She loves to teach! If you want to learn, you’ve come to the right place.
Isn't it great when you're looking at old family photos and you find notes written on the back that describe what's in the photo? Did you know that you can do the same thing with Google Photos?
When viewing photos on a computer, click the i to open the Info panel and you'll see a field called Description where you can write whatever you want. On a mobile device, just swipe up on the photo to reveal the info panel.
Watch this video to see how to view those descriptions. https://youtu.be/f1muGsJQ2Tc
Chris Guld is President and Teacher-in-Chief at GeeksOnTour.com. She has been in computer training and support since 1983. She is now a Product Expert for the Google Photos Forum, owner of the LearnGooglePhotos.com blog, and author of Mrs. Geek's Guide to Google Photos. She loves to teach! If you want to learn, you’ve come to the right place.
On a computer, you can see the timeline of your
photos by moving your mouse to the right sidebar.
These dates represent the date the photo was taken.
When you use Google Photos to store your pictures, they are organized in one great big stream, by date the photo was taken. The most recent photo is on the top, as you scroll down you're going back in time. On a mobile device you can pinch the screen until you see your photos grouped by year and month.
Old Photos get lost
A friend of mine just uploaded a group of old photos from her computer to Google Photos. When she opened Google Photos, she expected to see those photos at the top. When they weren't there, she assumed she had done something wrong and not uploaded them correctly. She tried it again - still no photos.
What she didn't realize is that these old photos got organized into her "stream" according to the date they were taken. She had no idea what dates these photos were taken, so she had no way to find them!
How to change the order to "Date Uploaded"
Google Photos does not give us many tools to re-order photos. Albums are generally our only tool for customizing how photos are grouped. But, there is a way to just view your library in order of Date-Uploaded rather than Date-taken.
On a computer/browser view your photos
Click in the search bar at top, don't type anything to search for
Scroll down to the section that includes Videos, Selfies, Screenshots - click "Show More"
Now you should see an option for "Recently Added" - click that
You should now be viewing your library of photos with the most recently added at the top, scroll down and you still go back in time, but by date added now rather than date taken
What about Mobile apps?
[Jan 2020 update] you can now enter "Recently Added" in the search bar to see your library in date added order.
On mobile apps this option does not show up. I have no idea why. The search bar is there, when you click on it you see Videos, Selfies, Screenshots and "Show More," but when you click Show More you will not see Recently Added!?!?!
Where there's a will, there's a way! On your mobile device, instead of using the Google Photos app, open a browser and go to Photos.Google.com - just like you would on a computer. Now you will be seeing the same thing you do on a computer - including the Show More with Recently Added.
On a browser, after you've clicked the Recently Added option, take a look at your address bar - you will see the specific URL that has been used. You can enter that URL yourself (or save a bookmark)
Mrs. Geek's Guide to Google Photos
If you have the book, this feature is covered in Chapter 5: Explore and Organize. The section is called "View by Date Uploaded."
" Chris Guld is President and Teacher-in-Chief at GeeksOnTour.com. She has been in computer training and support since 1983. She is now a Top Contributor for the Google Photos Forum, owner of the LearnGooglePhotos.com blog, and author of Mrs. Geek's Guide to Google Photos. She loves to teach! If you want to learn, you’ve come to the right place.
Have you ever mistakenly taken lots of pictures of the inside of your pocket? or your thumb over the lens of your phone? Using Google Photos on your smartphone, it’s easy to select them all and delete. Just touch and hold on the first one and drag thru the rest of the group. You can select a few or even hundreds of photos this way. In fact, the only problem with it is that it is too easy! With one little slip of the finger, you can select hundreds when you only meant to select a few. It just takes a little practice to get just the ones you want.
When they are all selected, tap the trashcan icon to delete them. This will delete them from the device as well as from the cloud. The trashcan icon means, “these photos are garbage, delete them from everywhere.”
I've heard people lamenting the fact that they never have enough time to organize all their photos. They want to see them grouped by year and month, Right now, they have them on their computer in all sorts of different folders they've created over the years. How can they start all over, clean up and just view them by date.
Google Photos is the answer. Upload your pictures to your Google Photos account (unlimited free storage forever) and they will automatically be viewable by date. While viewing your library of photos, you can pinch the screen on your phone or tablet and see them grouped by year, then month. No work at all on your part!
Chris Guld is President and Teacher-in-Chief at GeeksOnTour.com. She has been in computer training and support since 1983. She is now a Top Contributor for the Google Photos Forum, owner of the LearnGooglePhotos.com blog, and author of Mrs. Geek's Guide to Google Photos. She loves to teach! If you want to learn, you’ve come to the right place.
I count on Google Photos to keep ALL my photos together, in one place with no effort on my part. Once I’ve installed the Google Photos app on my mobile devices, and the Desktop Uploader on my computers, I no longer need to manage my library of photos. No more worries. I know that they are all there, online at photos.google.com in date order. And, if I’m looking for a particular person, place, thing, or event, Google’s search or automatic albums will probably show me what I want to see.
Monthly Albums
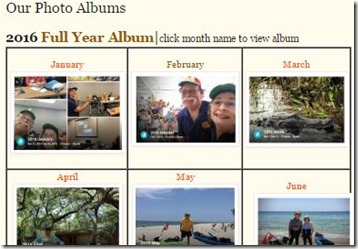
Google Photos keeps my entire library of photos – 58,000 of them according to my Google Dashboard – but I want to be able to browse just those best pictures from each month. At the end of the year, I want to be able to see something like the image at right. Most of the work involved here is to select those best pictures and add them to a monthly album.
This is work I do all year long. For example, just yesterday I started my album for January 2017. It’s not something I do on the 1st of each month, it’s something I do when I take my first good picture of the month. With that picture open, I click the 3-dot menu at top right and “Add to Album.” I give the new album a name: 201701 January. Then, throughout the month, I keep adding my best pictures to that “official” monthly album. I may also make albums for special events, but I definitely have an album for each month.
At the end of the year, the work for my monthly albums should already be done, but now is the time to review and add/delete as I see fit.
Monthly Backups to Computer
I trust Google to keep my 58,000 photos safe, but I want to be doubly sure I have copies of my best, monthly pictures. To that end, I download each monthly album from Google Photos to a USB hard drive on my computer. That way, even if I’m not connected to the Internet, I know I have all my best pictures with me offline. Google Photos makes this easy, just open the desired album, click the 3-dot menu at upper right and Download all. This will create a .zip file on your drive – unzip it and you have your pictures.
I actually prefer using Picasa on my computer to perform this task. I open Picasa and use the File menu, Import from Google Photos. Then I can find the album in question and it downloads the pictures, and all captions so I can view them using Picasa – no unzipping required.
Yearly Album and Slideshow
At the end of the year, I have 12 albums with 1-200 photos each. That’s still a lot of pictures to view! I like to see my year at a glance, one album with 2-300 pictures. So, I select my best photos from the monthly albums and create an album named simply 2016. It’s pretty easy to do since I can start with the monthly albums, select the best of the best, click the + in the upper right and add to album – 2016.
YouTube makes it single-click easy to take that album and make a slideshow/movie out of it!
Getting the Year at a Glance Page
If you would like to have a year at a glance page like the one in my image above, I suppose I should tell you how I did that! There is no automatic way to do this – maybe someday Google will give us a shareable year at a glance, but for now it’s a manual process. I use Blogger, and Live Writer. You could use whatever tools you know that can create hyperlinks and images. You could even use Word, or Google Docs to create a document with the links to each month’s albums.
The links to each month are easy. Using Google Photos, open the January album, then click the share button and select “Get Link.” Copy that link and then use it to create a hyperlink out of the word January. Repeat for each month:
The thumbnail images are not so easy. I use Windows Snipping tool to grab a small image of the picture I want to represent the month, then paste it into my Blogger file using Live Writer. I’ll be happy to make a video about that if any of you use Blogger and Open Live Writer and are interested. Leave a comment.
#7: It makes fun creations from your photos and videos.
Sometimes it does it automatically without you even asking. Sometimes you want to make some yourself. This fireworks example is an animation. The movies even add music!
#6: It's so easy to share a picture, or lots of pictures.
All you do is select the picture(s) tap the share button, and select the person(s) from your contacts. If you choose their email address, they will receive the photo in an email. If you choose their phone number, they will receive the text, if they use Google Photos, you can skip email or phone and send it directly to their Google Photos account. It will show up in their Google Photo's Assistant.
#5: You can edit your photos on the phone/tablet, or on the computer.
Just one tap on "Auto" can make a world of difference. Want your picture to have more pizazz? Try the Pop button! You can straighten a crooked horizon by tapping the Crop/Rotate tool and drag a slider to change the angle of the photo. Any edits you make will synchronize to all your devices.
#4: You can make albums to show off your best photos.
Just select the photos you want to include, tap the 3-dot menu and Add to Album. Once an album is made, you can edit it to re-organize the photos, add maps, and even add text blocks to fully tell your story.
#3: Auto Backup and Free Up Space
Cellphone photos will automatically backup to "the cloud" - your Google Account online. Once you verify they made the trip, you can remove them from the phone with one command - Free Up Space.
#2: Find the Photos you Want with Sort, Search and Automatic Albums
Google PHotos keeps your entire library of photos (over 50,000 for me) in order by date. A simple pinch on the screen and you see years and months grouped together. Looking for a particular picture? Try search. I can come up with that one photo of kayaking in La Jolla by searching for "Kayaking in La Jolla" !! There are also automatic groupings by Faces, Places, and Things.
#1: Google Photos is a Forever Home for your Lifetime of Photos
The number one, best reason to use Google Photos is that it can collect your photos from many sources and store them in one place - your Google Account online - with unlimited storage, for free, forever! By uploading from my mobile devices, uploading from my computer and all external hard drives, I have a master collection of over 50,000 pictures. I can see all of them from any device I happen to have available.
Just a sampling of my 56,000+ photos as seen with Google Photos on my phone.
Chris Guld (aka Mrs. Geek) is President and Teacher-in-Chief t GeeksOnTour.com. She has been in computer training and support since 1983 and owned a Computer Training Center called Computer Savvy from 1983-1996. She was one of the first WordPerfect Certified trainers in 1986; President of the International Computer Training Association in 1993; Author of the Beginner’s Guide to Picasa and the PicasaGeeks.com website. She is now a Top Contributor for the Google Photos Forum and owner of the LearnGooglePhotos.com blog. She loves to teach! If you want to learn, you’ve come to the right place.
Losing precious photos is what we want to avoid! Google Photo’s primary purpose is to keep your photos backed up and safe, but if you don’t understand where they’re getting backed up and how delete works, you could still end up losing them! I have three important points for you:
Be sure to verify that your photos are, in fact, backed up. Please check your account, on a computer, at photos.google.com to verify that your phone’s photos have successfully made it to your account online. Even if you trust the "all backed up" message, I still advise that you view your photos online to verify that you know the username and password for the account that is being used!
Don’t use the trashcan icon unless you never want to see that photo again.
If your goal is to make room on your phone by deleting pictures, use Google Photos "Free Up Space" command. Settings, Free Up Space.
Delete from All Sync’ed Devices with Trashcan icon
When you use the trashcan icon in Google Photos, you are saying this picture is garbage. You don’t want it anywhere. This will delete the selected picture(s) from the current location – the phone/tablet in your hand or the web (photos.google.com) if you’re using a computer. The trashcan will also delete the selected picture(s) from any sync’ed devices. A sync’ed device is a smartphone or tablet that has the Google Photos app with Backup and Sync turned on. A computer is not a sync’ed device – if you have these same pictures stored on a computer’s hard drive, they will not be affected.
Delete from Device Only by using the menu
If you want to remove some pictures from your phone, but leave them untouched on the photos.google.com website don’t use the trashcan! Instead:
Select photos to remove
Tap 3-dot menu
Android: Delete Device Copy
iPhone: Delete Device Original
If you don’t see an option to delete from device only, you may have selected photos that weren’t taken with that device and therefore do not exist to be deleted! That is also the explanation for the image at right where 15 pictures are selected, but only 6 device originals are among them.
On Apple devices, there is one more step. Whenever you delete a photo on an iPhone or iPad, it’s not actually deleted, it’s just moved to the Recently Deleted Album. So, those photos are still taking up space on your device. If you want to completely erase them, you need to go to the Apple Photos app, Albums, Recently Deleted, and erase them from there.
Delete all Backed Up Photos from the Device with One Command: Free Up Space
Google Photos keeps track of the photos that have successfully been backed up (uploaded to your Google Account.) Therefore, it can delete all the photos from your device with one command.
Tap the 3-line menu
Free Up Space
It will report how many photos and videos are found and then you tap Remove
Androids with SD cards
If you are using an Android device with an SD card, odds are that Google Photos does not have permission to write to that SD card. (February 2017 update: the Android update to Nougat has fixed this for most people) That means, if you try to delete a photo using Google Photos, it can’t. You have to use the native gallery app to do that. Although this renders your SD card rather useless, I don’t see it as a huge problem. I set my camera to use the internal phone memory even though I have an SD card available. This memory will fill up fast, so I use Google Photos “Free Up Space” command often. Very few of my photos are actually stored on my phone, but Google Photos shows me all the photos in my account – all 50,000 of them – as if they were on the phone.
Chris Guld is President and Teacher-in-Chief at GeeksOnTour.com. She has been in computer training and support since 1983 and owned a Computer Training Center called Computer Savvy from 1983-1996. She was one of the first WordPerfect Certified trainers in 1986; President of the International Computer Training Association in 1993; Author of the Beginner’s Guide to Picasa and the PicasaGeeks.com website. She is now a Top Contributor for the Google Photos Forum and owner of the LearnGooglePhotos.com blog. She loves to teach! If you want to learn, you’ve come to the right place.
by Chris Guld, GeeksOnTour.com
On our What Does This Button Do? show this past week (Episode 85) we demonstrated some search tricks with Google Photos. Slide the YouTube playhead to the 17 minute, 13 second mark to see the demos.
Step One: Automatic Face Groups
If you use Google Photos, you probably know that it automatically groups like faces together, but did you know that you can ask for pictures that have 2 particular people in the photo? I have 50,000 photos in my Google Photos library. With one search, I can instantly see just the photos with two named people in the photo.
Obviously there are lots of pictures of people in my 50,000 collection. With one click on Albums, then another on People, I see automatic Face Groups. Click on one face and I see all the pictures with just that face.
Step Two: Name the Face Groups
When you click on the face of any group, it opens up to display all the photos that include that face. You will also see a little note asking “Who's this? Add a private label to search by name” Just type a name in the space provided and click Done.
Step Three: Search for Two Names
Once the faces are named, you can now use Search. In the example above, clicking on Jim displays hundreds of photos with Jim’s face, clicking on Devon does the same with Devon’s face. But using Search for Jim and Devon, and the results are just dozens of photos with both Jim and Devon in the shot.
Have Fun Searching! Chris Guld is President and Teacher-in-Chief at GeeksOnTour.com. She has been in computer training and support since 1983 and owned a Computer Training Center called Computer Savvy from 1983-1996. She was one of the first WordPerfect Certified trainers in 1986; President of the International Computer Training Association in 1993; Author of the Beginner’s Guide to Picasa and the PicasaGeeks.com website. She is now a Top Contributor for the Google Photos Forum and owner of the LearnGooglePhotos.com blog. She loves to teach! If you want to learn, you’ve come to the right place.
I have roughly 50,000 photos collected online using Google Photos.
Wanna watch my slideshow? I’ll bet not! You’d need a few days of uninterrupted time, and several buckets of popcorn!
No, I want to select just my best pictures and put them in Albums. Then I’ll share my Albums with you.
How to Make Albums using Google Photos on a Mobile Device
I do still use a computer, but more and more, it’s my phone that I use to view pictures. It’s nice that I don’t have to use a computer in order to organize my photos into albums. It also doesn’t matter if I use my Samsung Galaxy phone, my iPhone, or my iPad. All of these devices can run the Google Photos app, and they’ll all be looking at my same library of photos.
Select one or more pictures: LongPress on one picture and it will be selected and open up a selection ‘button’ for all your other pictures. Any further pictures you tap on will be added to the selection. You can also select a group all at once by long-pressing on the first and drag thru the rest of the group.
Tap the + in the upper right. This opens up your options to create a new Album (or Movie, Animation, Collage) or Add to an Existing one. You need to scroll down to see the Existing Albums.
If you choose Create New Album – you will be prompted for an Album Name. If you do nothing here, it will be named “Untitled”
Done!
If you make an album by accident, you can delete it by tapping on the 3-dot menu in upper right and choose Delete Album. Note that the album needs to be selected first.
How to Make Albums using Google Photos on a Computer
Realize when you’re viewing your Google Photos on a computer (photos.google.com) you’re looking at the same 50,000 pictures as you are when you use a phone. Any albums you create using the phone will be viewable using the computer – and vice versa.
Select one or more pictures. When you hover your mouse over a photo, you will see a selection button (round checkmark) appear in the upper left corner – click that to select one photo. Click the select button on further photos to add to the selection. You will see a count of how many photos are selected in the blue bar that appears at the top of your screen. To select a group of photos use the standard procedure of clicking on the first picture, then holding the shift key down when you click on the last picture in the group.
Tap the + in the upper right of screen and select Album (as opposed to Shared, Animation, or Collage)
Next you have the option to make a New album or add to Existing
If you chose New – you will be prompted for an Album name
Done
If you upload photos from your computer to Google Photos, you will have the option to add all photos just uploaded to an album. See this demo we did in Episode 77 of our “What Does This Button Do?” on uploading from computer directly to an album.
How to Make a Google Photos Album using Picasa
If you’re accustomed to using Picasa to make your Web Albums – nothing has changed.
Select the photos you want to upload to an Album
Click the Green Button at the bottom “Upload to Google Photos”
Choose an existing album from the drop-down list, or Click New to make a new album and give it a name.
For size – we recommend the “Original Size” setting. This will initially count against your Google storage allotment rather than free, but you can use the “Recover Storage” feature later to convert the photos to “High Quality.”
So there you have it! The best of both worlds. All 50,000 photos stored safely, for your eyes only, in your Google Account. And, the best photos available in albums so you don’t have to go slogging thru all the riff-raff. If you want to share, use the share button on an album!
Geeks on Tour presents a Free Weekly Web Class all about learning to use smartphones and tablets. We have focused on Google Photos for several of these shows, each one is 40-60 minutes.
We recently presented a Google Photos seminar to a Genealogy group. We used our smartphone and snapped pictures of old photos in a photo album. These were pictures of my Great Grandfather, Charles Noyes, and my Great Grandmother, Mae Manning Noyes. Charles was born in 1869 and Mae was born in 1872, yet when I snap a copy of their photo – the resulting picture will be dated in 2016!
Photos are Automatically Sorted by Date
In Google Photos, your library of pictures is kept in order by date – period. You can make albums to group selected pictures any way you want, but the library of all your photos is viewed in a dated stream with the most recent on top. It is wonderful to view the pictures of my life in order like that, and with just a little bit of work, the photos of my Great Grandparents can also be put in order where they belong – in the 1800s.
Use a Computer to Change the Date
Google Photos can be used on an Android device or an Apple iOS device, but for this particular feature, you need a computer. Added Oct 2016: it is now available on the iOS version.
On any computer, open a web browser (preferably Chrome) and go to Photos.Google.com. Be sure you’re logged in with your account
Find the photo that needs a date change and click it
Click the i button in the upper right. That stands for Info and it will open a right sidebar
Hover over the date and a pencil will appear – click on the pencil and you can edit the date, time, or Time Zone.
Enter the desired date, then click Save.
Added Aug 2016: you can now select multiple photos then change the date for all, just click the 3-dot menu - Edit Date and Time
Your picture will be instantly relocated, in the stream of all your photos, to it’s proper date ordered position.
One downside you should know – this date lives in the Google Photos database, it is not saved to the metadata of the photo itself. If you download this picture from Google Photos to your hard drive, the picture will show with its original date. To change the metadata, you need to use another tool, like Picasa. See this article: Forget to Set the Time on your Camera? Picasa can Fix That!
This article is by Chris Guld, of GeeksOnTour.com. To learn more, see the Google Photos Tutorial Video page, and consider becoming a member in order to view all the tutorial videos.
Note: Thanks to Connie Bradish for the research to tell me when my Great Grandparents were born! You may get me into genealogy yet!