Translate

Showing posts with label Sharing Photos. Show all posts

Friday, May 17, 2019

Adding and Removing Photos from Albums

Album View in Google Photos
I take lots of photos. If I'm in a beautiful area I may take 1-2,000 in a month. I love them all and I don't want to delete any, (that's work) but I do want to be able to find and show just my best (that's fun.)
That's what Albums are for.

Develop your own Album "system."

When I'm browsing my photos and I see one that is particularly good, I want to add it to an appropriate album. We are traveling and taking pictures all the time, so I've developed a system where I make an album for each month. I name it starting with 4 digits for the year, then a dash and 2 digits for the month. That makes them easy to search. I start an album at the beginning of the month and add photos as I go. If I want to see my best photos from July 2018, I just search for 2018-07. I also make albums for specific events.

To add a photo to an album

  1. Open the photo on my phone
  2. Tap the 3-dot menu in the upper right
  3. Choose Add to Album
  4. Scroll down the list and tap the appropriate album (note: once you have a lot of albums, you may need to scroll a ways. Albums are in date order by the most recent photo in the album. Once you've added one photo, that album will show up at the top as a Recent album the next time.)

To remove a photo from an album

If you're looking at an album and you decide that a given photo or video does not belong there:
  1. Select or open the photo and tap the 3-dot menu in upper right
  2. Choose Remove from Album
  3.  When prompted to confirm, tap "Remove"
If you change your mind, you can always find that photo in your Google Photos library and add it back. 

Albums are our one organizing tool

Once you have your best photos in named albums, you can use the albums to share with friends. You can also create printed books from the album photos. I make albums primarily for myself, just so I can easily find my best photos from any given month or occasion. Unfortunately there is no way to sort albums yet. There is also no way to categorize albums, for example by work or travel. Hopefully these are features that will be added sometime. 
I just click on the Album tab in my Google Photos app and I can scroll to an album I want, or if I don't see it right away, I can search. As soon as you start typing a search term, the top Autocomplete suggestions will be albums, if you have any matches. Get familiar with the icon that signifies album:

To learn more, see Chapter 7 in Mrs. Geek's Guide to Google Photos. Also try going to GeeksOnTour.com and use the search feature at the top right to search for albums. You will find a wealth of material there! Some is free, some is for members only.

If you've never used albums before - start now! 


Chris Guld is President and Teacher-in-Chief at GeeksOnTour.com. She has been in computer training and support since 1983. She is now a Top Contributor for the Google Photos Forum, owner of the LearnGooglePhotos.com blog, and author of Mrs. Geek's Guide to Google Photos
She loves to teach! If you want to learn, you’ve come to the right place.

Friday, January 4, 2019

Google Photos is not a social network, or is it?

I recently read an article by Mike Elgan about how he plans to use a Google Photos album to keep in touch with friends and family instead of Facebook. He calls it How I replaced Facebook with Nicebook. "Nicebook" is the name he gave to his Photo album that he invites anyone to look at and comment on.

Interesting, but I don't think it's going to work.

You know I love Google Photos, and I definitely use albums to organize my photos. I make an album for every month as a matter of course. This allows me to easily browse thru my photos from any given time and remember where I was and what I was doing. I put links to these albums on a public blog page so anyone can see them if they like, but I do it for me. Really, does anyone else care about my pictures like I do?
I make an album for every month. To learn how I do this, watch episode 159 of our YouTube show

Google Photos is GREAT for sharing albums of trips and events

48 people followed our Italy album as it grew 
I share albums of special trips or events. In 2017, when we spent a month in Italy and Croatia, I invited anyone who reads my Facebook posts, or our Geeks on Tour newsletter, to "join" our photo album. For anyone who did that, two things happened: 
  1. They got notified any time we added new photos to the album, which was daily. This way they were following along, in almost real time.
  2. They could comment on any photo, or the album as a whole, and we could comment back. This provided a conversation with our followers.
Anyone can view the album and all the photos and videos contained in the album. Only if you have a Google account and are signed in can you "join" the album. Then it will show up in your Google Photos app in the Sharing section.
This month, Jim and I are headed off to Australia and then New Zealand and, once again, we will share the album in advance so anyone can follow along. It worked great in 2017 and I expect it to work great in 2019. We will be connected, photo by photo, with anyone who is interested. They can comment to us and we can comment back without involving any other social network besides our own photo album.

We do not allow collaboration on our shared albums

Realize that I am not talking about a group shared album. It's called "collaboration" when you set up an album where several people can contribute photos and videos to the album. This is great for weddings, or sports events, or group trips, where one person creates the album and invites the others in the group to add their photos as well. When you use this feature, you don't want just anyone to get hold of the link. If hundreds, or thousands of people have the link - they are all able to add their photos and videos. I've known people to test this, and it doesn't take long before you have some very undesirable content in the album. Then it becomes an unwelcome job to monitor the album and block the offending users.

Shared Albums vs Facebook


Shared Albums

Facebook
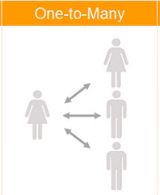
I see my shared album as a one-to-many communication tool, where the "one" is me and my photo album and the "many" is all the people who click the link to view it, and perhaps to join it.
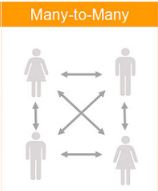
Facebook is so much more than that. Facebook is many-to-many. I use Facebook because so many of my friends are there. In just a few minutes each day, I can catch up with my friends and see what is going on with them. I may not even post anything about myself. A shared album can't do that. Besides, how would I let people know about the shared album if it weren't for Facebook! That's where I post the link where all of my friends will see it. The shared album means I can post less on Facebook. An occasional photo will do, along with the link to the album for anyone who wants to see more.
I applaud Mike Elgan for thinking outside the box with Google Photos, and I joined his album so I can follow along. But I can't give up Facebook yet. What about you?


Chris Guld is President and Teacher-in-Chief at GeeksOnTour.com. She has been in computer training and support since 1983. She is now a Product Expert for the Google Photos Forum, owner of the LearnGooglePhotos.com blog, and author of Mrs. Geek's Guide to Google Photos
She loves to teach! If you want to learn, you’ve come to the right place.

Saturday, April 1, 2017

It’s So Easy to Send Photos Using Google Photos

We’ve been parked in the Arizona desert for several days. I prefer the humidity and ocean views of my home state of Florida … BUT, the sunsets here are spectacular. The Arizona desert with it’s saguaro cactus, wide open vistas, and abrupt mountains are a photographer’s delight. I’ve snapped several hundred photos in just a few days.


Do you see that last photo? I remember thinking, "If I owned that camper, I would love to have this photo of it as a silhouette in the desert sunset!" Just then, the people in the trailer started out to take their dogs for a walk. Cool! I'll just walk over there and get their email.
 
Distances in the desert are deceiving! I had to walk for a while, changing my direction to head towards where they were going rather than where they were. If they noticed me, they might be a little freaked out that they were being stalked! But, eventually our paths intersected, and I assured them I was harmless.
 
I showed them the photo on my iPhone and they said yes, they'd like to have that. All I needed was their email and it was done. Here's how:
  1. Open the photo using Google Photos
  2. Tap the Share button
    Android iPhone
  3. tap Next - on iPhone only. This gives you the chance to select more photos before sending
  4. Type in their email address in the space provided, then tap Add Recipient (optional: you can add other people from your contact list)
  5. Optional: there is a field at the bottom of the screen where you can type a message
  6. Tap Send in the upper right.
That's it! The hardest part was the walk. Once I got there, I showed them the picture, tapped the share button, entered their email address and tapped send.


What They Receive

When they open their email, they will see something like this:
 
If all they wanted was to see the picture, they're done. If they want the picture for their own, they need to click on the button to "View Photo." This takes them to a Google Photos interface.

  • If they have a Google Photos account, it's one click on the "Save to Library" buttonand the picture (or pictures if I had shared more) is now in their Google Photos library.  
  • If they don't have a Google Photos account, they need to click on the photo to make it full screen, then tap the 3-dot menu and Download. 
 

Chris Guld is President and Teacher-in-Chief at GeeksOnTour.com. She has been in computer training and support since 1983. She is now a Top Contributor for the Google Photos Forum, owner of the LearnGooglePhotos.com blog, and author of Mrs. Geek's Guide to Google Photos.
She loves to teach! If you want to learn, you’ve come to the right place.

Monday, February 13, 2017

How to Make a Group Photo Album with Google Photos

imageWhen I got married, many years ago, we wanted to get everyone to take pictures and share them with us. We accomplished that by buying lots of disposable cameras and placing them on the tables around the room. We asked people to pick up any camera nearby and snap some photos. Then, at the end of the party, we collected all the cameras and had the film developed. Pretty ingenious don’t ya think? I don’t remember how we let all the guests see those pictures, lots of prints sent by mail I guess. Or, we just had to have them over later to look at our album.

Google Photos and Shared Albums

Today, I have several groups of people that like to see each others’ photos. One group has nearly 50 people in the group and they all add lots of photos. The album got so full over the course of the year, that we started a new one for the new year. I also have a very small group (me and Jim!) with a shared album. It’s a great way to let each other have access to our best photos.

Google Photos makes it very easy to create a group album.

  • Click on the Assistant
  • Notice the “Create New” buttons at the top. Click the Shared Album button.

image

  • Select the pictures you want to share and click the Share button in upper right
  • Enter a title for the album
  • imageClick the Share button in upper right, and select people to share with. Anyone can see the photos you share, only people using Google Potos – you see the logo by their face – will be able to add their own photos to the album

The person who creates the album is the owner, the other members of the group are collaborators. Everyone can add and/or remove their own photos to the album. Only the owner can remove others’ photos. Once photos are in the album, any of the group can leave comments on any photo, or on the entire album. It becomes a great private party with pictures and conversation.

It’s Easy to Share, Perhaps Too Easy

The way shared albums work is thru a web address, a URL. When you share the album with 3 friends, you are giving those 3 friends the address of the album.

This is great. The 4 of you have your own private world to look at, and comment on, each others photos. As long as you keep it among yourselves, it is private. If any of the 4 give the address to a 5th person, then the 5th person can be part of the group. This can be very good. It’s easy to add people to your group. The key is trust among the original 4. You need to trust that they won’t give the address to just anyone. They need to know not to post the address in a public place, or in their social network.

Thursday, January 5, 2017

Mrs. Geek’s Year End Photo Tasks

albumsI count on Google Photos to keep ALL my photos together, in one place with no effort on my part. Once I’ve installed the Google Photos app on my mobile devices, and the Desktop Uploader on my computers, I no longer need to manage my library of photos. No more worries.  I know that they are all there, online at photos.google.com in date order. And, if I’m looking for a particular person, place, thing, or event, Google’s search or automatic albums will probably show me what I want to see.

Monthly Albums

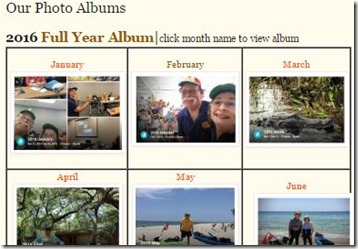
Google Photos keeps  my entire library of photos – 58,000 of them according to my Google Dashboard – but I want to be able to browse just those best pictures from each month. At the end of the year, I want to be able to see something like the image at right. Most of the work involved here is to select those best pictures and add them to a monthly album.

This is work I do all year long. For example, just yesterday I started my album for January 2017. It’s not something I do on the 1st of each month, it’s something I do when I take my first good picture of the month. With that picture open, I click the 3-dot menu at top right and “Add to Album.” I give the new album a name: 201701 January. Then, throughout the month, I keep adding my best pictures to that “official” monthly album. I may also make albums for special events, but I definitely have an album for each month.

At the end of the year, the work for my monthly albums should already be done, but now is the time to review and add/delete as I see fit.

Monthly Backups to Computer

I trust Google to keep my 58,000 photos safe, but I want to be doubly sure I have copies of my best, monthly pictures. To that end, I download each monthly album from Google Photos to a USB hard drive on my computer. That way, even if I’m not connected to the Internet, I know I have all my best pictures with me offline. Google Photos makes this easy, just open the desired album, click the 3-dot menu at upper right and Download all. This will create a .zip file on your drive – unzip it and you have your pictures.

I actually prefer using Picasa on my computer to perform this task. I open Picasa and use the File menu, Import from Google Photos. Then I can find the album in question and it downloads the pictures, and all captions so I can view them using Picasa – no unzipping required.

Yearly Album and Slideshow

At the end of the year, I have 12 albums with 1-200 photos each. That’s still a lot of pictures to view! I like to see my year at a glance, one album with 2-300 pictures. So, I select my best photos from the monthly albums and create an album named simply 2016. It’s pretty easy to do since I can start with the monthly albums, select the best of the best, click the + in the upper right and add to album – 2016.

YouTube makes it single-click easy to take that album and make a slideshow/movie out of it!

Getting the Year at a Glance Page

If you would like to have a year at a glance page like the one in my image above, I suppose I should tell you how I did that! There is no automatic way to do this – maybe someday Google will give us a shareable year at a glance, but for now it’s a manual process. I use Blogger, and Live Writer. You could use whatever tools you know that can create hyperlinks and images. You could even use Word, or Google Docs to create a document with the links to each month’s albums.

The links to each month are easy. Using Google Photos, open the January album, then click the share button imageand select “Get Link.” Copy that link and then use it to create a hyperlink out of the word January. Repeat for each month:

The thumbnail images are not so easy. I use Windows Snipping tool to grab a small image of the picture I want to represent the month, then paste it into my Blogger file using Live Writer. I’ll be happy to make a video about that if any of you use Blogger and Open Live Writer and  are interested. Leave a comment.

Wednesday, June 15, 2016

How Do I Send My Photos to a Friend?

by Chris Guld, GeeksOnTour.com
If you and your friend both use Google Photos, it is so easy to send them photos. You can send just one, or you can send hundreds of photos with one link, no need to break it up into small pieces, no need to attach to emails. There is also no need to use time and bandwidth to download and upload, because this process gets the pictures from your account in the cloud and transfers them directly to your friend's account in the cloud.
mycloud2yours
To send a group of photos to a friend, follow these steps:
  1. You can use a computer and Photos.Google.com, or a mobile device and the Google Photos App
  2. Select the photos you want to send. You can select large groups by first putting them in an album, then sharing the album. You can also select a large group of photos on a computer by selecting the first one, scrolling down to the last and hold the shift key as you click on it. You can then click to deselect any pictures that don't belong. On a mobile device, long-press on the first one and drag thru the rest.
  3. Click the share button and choose Get Link. On mobile, Share will be under the 3-dot menu. A link has now been copied.
  4. You can now paste that link into an email that you send to your friend. You can also paste it into a text message, or a facebook post, or even a blog page.
  5. When your friend receives the link and clicks it, they will see all the pictures you shared. They don't need a Google Photos Account to see them, but if they do use Google Photos and are logged into their account, they will see a cloud button with a down arrow, or the word Save. When they click that, all the pictures they see will be added to their own Google Photos library.
That's it! You select and send. Your friend opens and saves.
If you are a GeeksOnTour.com premium member, you should watch the following videos from the Google Photos learning group:
  1. 435.Google Photos Selecting on Computer
  2. 436.Google Photos – Send Pictures to a Friend
  3. 621.Google Photos-Share Album Link