Translate

Showing posts with label Google Photos for Picasa Users. Show all posts

Friday, December 22, 2017

Moving from Picasa to Google Photos

imageAs Geeks on Tour – we do a weekly webcast called “What Does This Button Do?” Episode 132 recorded on 12/17/17, was about Google Photos for Picasa users. You can watch this hour-long episode on YouTube.
If you’re still using Picasa as your only tool for managing your photos, it’s time to get serious about moving to Google Photos in the cloud. Picasa still works, on both Windows and Mac computers, it works today, it will work tomorrow, but you never know when there may be an update that will render it useless. If you buy a new computer, you’re going to have trouble finding the Picasa installation file because it is no longer officially available. We do have a copy of it that is available for our Geeks on Tour members, and you can probably find it elsewhere by searching for “Picasa Installation File.”

The future is in the cloud

The world of technology is all moving to the cloud. Picasa is a computer-based program, Google Photos is cloud-based. Picasa is old, Google Photos is new.  If you take your pictures with a smartphone, the Google Photos app is fully automatic for uploading your photos to your Google account online and making them available to all your devices, including your computers.
But, what about all those old pictures that are still on your computer? Or the ones that you stored on external hard drives or even CDs/DVDs? If you upload them all up to your Google account in the cloud, you will then have your entire lifetime of photos available any time you look at your Google photos. I can tell you, it is thrilling when I can show someone photos of my childhood in Alaska by opening the Google Photos app on my phone and searching for Alaska. Or my wedding photos from 20 years ago, by easily scrolling back to that date. Be careful though, you may lose some friends if you do this every time you see them! But even your most photo-averse friends will appreciate it when you can instantly pull up that picture of them receiving an award 10 years ago.

Moving photos from Picasa to Google Photos

You don’t need Picasa to move your photos to the cloud – all the photos you see in Picasa are actually on your hard drive and Episode 132, mentioned above showed 2 ways of moving them from your hard drive to your Google Photos account.
  • The “Pull” method of uploading your photos: with this method you need to select actual pictures, not folders full of pictures
  • The “Push” method of uploading your photos: with this method you can select a folder and all the photos in that folder as well as any sub-folders will be uploaded. It will not maintain the folder structure, no albums will be created for the folders. It just gathers all the photos from within the folders and uploads them to your Google Photos library.
If you do have Picasa, and you like the way you have your pictures in folders, you can use Picasa’s Upload command to both upload AND create corresponding albums in Google Photos.

2018 Update: this is no longer available, see Bad News about Picasa … but we were warned
  1. View your folders using Picasa, make sure you have logged in to the appropriate Google account. You will see it in the upper right corner.
  2. Select a folder (or an album) and click the Upload button. Notice that my folder name is “January” – this is not good. I might end up with lots of “January” albums and there is no such thing as nesting in Google Photos. I highly recommend renaming such folders to 2005 January, or 2005-01 or something that uniquely identifies it, before uploading to Google Photos.
    picasa-upload
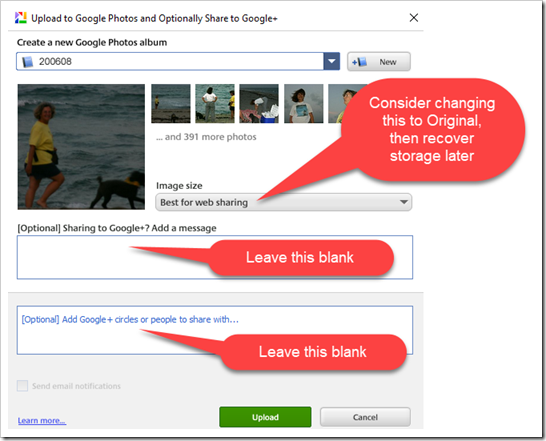
  3. Upload Options: notice when you upload with Picasa, it is set to automatically create a new Google Photos album with the same name as the folder being uploaded. In this example I learned not to name it just August, but 200608. When this is complete, all the photos in that folder in Picasa will be in your Google Photos library, AND you will have an album named 200608 with all the photos showing there.
    picasa-upload2
  4. Repeat for every folder (or album) you want uploaded to Google Photos.
    OR
    Use the Tools->Batch Upload command to simply check off all the folders or albums you want uploaded.
Using Picasa’s Batch Upload feature, you can upload many folders and albums at once

Using Backup and Sync

image
Backup and Sync is software for your computer that will do all the uploading for you. The problems with it are:

  1. It uploads photos from your computer to Google Photos, but does not create albums in Google photos. The photos are just added to your library.
  2. The default setting is to upload ALL the photos on your computer’s Desktop, Documents and Pictures. My bet is that there are lots of photos in your Documents folder, on your Desktop, and that do not belong in your Google Photos library.
  3. After it uploads the photos, it actively synchronizes any edits or deletions. You can turn off the option to synchronize deletions, but no such option exists for edits. For example, there have been reports that once your photos are resized to “High Quality” in the online version, that resizing is synchronizing back to the computer, converting the computer originals to the compressed size. The originals are gone. This is a bug that doesn’t affect everyone  and will be fixed, but why take the risk?
If you want to use Backup and Sync, my recommendation is to carefully select the folders you want it to upload. You can select a parent folder and it will upload all photos in any subfolders. So, for example, you could tell Backup and Sync to upload the My Pictures folder, and it will get all the photos within the My Pictures folder structure. Don’t accept the defaults that are to upload all the photos on your entire computer. Then, when the upload is complete, I recommend discontinuing the use of Backup and Sync. From now on, use the “Push” or “Pull” manual techniques above to add miscellaneous sets of photos from your computer to Google Photos. This way, you’re confident that whatever is on your computer is independent, safe, not being synced.
If you are a Google Drive user, that’s a whole different aspect of Backup and Sync. You can set it to synchronize your entire Google Photos library back down to your computer. That will be another lesson!

Tuesday, May 31, 2016

Using Picasa and Google Photos Together

imageby Chris Guld, GeeksOnTour.com

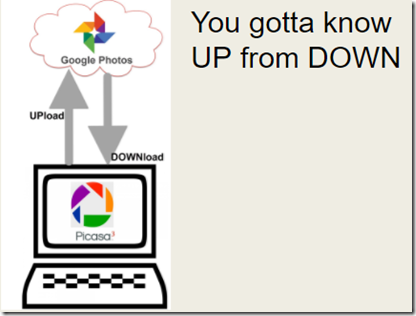
This is what I do now: All my photos collect in the cloud with Google Photos, I make albums of my best photos there, then I download those albums to my computer so I have them in Picasa for safekeeping, collages, text on photos etc. Picasa can Upload to Google Photos, creating an album of photos online. Picasa can also download Albums from Google photos online, creating folders of pictures on your computer that can even synchronize with the cloud.

To upload from Picasa on your computer to Google Photos

  1. Select the photos you want to upload. You’ll see them in the selection tray in the lower left.
  2. Click the Green “Upload to Google Photos” button, log in to your Google account if necessary
    image
  3. Select an existing Album, or click the New button and enter a new album name
  4. Choose a size: Original or Best for Sharing
    We recommend Original – this will count against your storage allotment, but you can recover that space later. Selecting Best for Sharing will reduce the resolution of your photos to 2048 px.
  5. Click Upload

To Download from Google Photos to your Computer and Picasa

  1. Click the File menu and Import from Google Photos
  2. Selecting “Import All Albums” will do just that, or clicking on “Import Selected Albums” allows you to specify
  3. These downloaded albums will create folders on your hard drive under the Pictures folder. They will show up in Picasa in the “Web Albums” collection below Folders
  4. In addition to downloading your photos to a folder, you can click the “Sync to Web” button so that any new photos added to the album will be added to the computer. So, you can make a collage using Picasa, then add that collage to the Synced folder and it will be uploaded to
    image

A major advantage to this method of downloading is that captions are preserved! If you added descriptions using Google Photos – those descriptions show up as captions in Picasa. This is not true when you use Google Photos download command. There is also one drawback to this method – Picasa will only download pictures that are not already on your computer. So, if some of these pictures in the Google Photos album started out on your computer, then the album download will create a folder that is missing those pictures. You can avoid this either by always uploading to the cloud first, and just downloading albums. Or, by using folder manager to limit what Picasa is seeing from your computer – fooling it, if you will, into not knowing that those photos already exist.

I use this method all the time to incorporate Picasa into my photo workflow. I gather all my pictures in the cloud with Google Photos – thousands of them – then I download just the best, the ones in albums.

For Geeks on Tour Premium Members

Here are some tutorial videos related to this subject. If you’re not a member, you can join here.

Saturday, October 31, 2015

Getting Your Pictures Down from the Google Photos Cloud

It’s easy to get your pictures UPloaded to the cloud – just turn on the Backup and Sync feature of the Google Photos app on your phone. But how do you get them down to your computer? Computers are not "synced" devices in the Google Photos system. The only way to get photos to your hard drive is manually.

I still want my pictures, at least my best ones, to be stored on my computer (or external hard drive.) I’m not comfortable with my only copy of pictures being the cloud copy. For the last 12 years my process has been to collect all pictures from my camera(s) and put them on my computer. Then to upload just the best ones to the cloud and share them. Now, because of Google Photos, my process is being reversed! Google Photos is automatically uploading all my photos to the cloud and I want the best ones copied down to my computer. I have identified 4 methods for downloading my pictures from the cloud (Google Photos) to my computer. Right now I like method 3 the best, but one of the other methods might suit your needs. Please leave a comment for what you think.

Method 1: Downloading Albums of Photos to your Computer

If you’ve used the Google Photos tools to put your best pictures into albums, you can then download those Albums to your computer.
  1. Open the desired album in Google Photos (on a computer using a Web Browser)
  2. Click the 3-dot menu in the upper right and choose “Download All”
  3. This will create a .zip file of all the pictures in the album and, depending on your browser’s settings, it will ask you where you want to save the zip file, or it will automatically save it in your Downloads folder. You can even save that .zip file straight to your external hard drive if you’d like.
  4. If your purpose for downloading is simply a backup, you’re done. If you want to see those pictures using Picasa, you need to Extract the picture files from the .zip and save them in the My Pictures folder, where Picasa will see them.

Method 2: Download Groups of Photos to your Computer

If you haven’t created albums, you can simply select a group of photos (click on the checkbox in the upper left corner of each photo.) Then click the 3-dot menu and choose download. This will create a .zip file just like in the method 1.

*Method 3: Downloading Individual Pictures to your Computer

*This is my current preferred method. I don’t want zip files, I want the individual pictures to be in my Pictures folder, preferably in the folder for the month they were taken. That’s been my system for the last 12 years and I kind of like it! Here’s how I do it when all my pictures are already in Google Photos:
  1. View my recent photos using Google Photos (using the Chrome browser.)
  2. When I see a ‘keeper’ I click the 3-dot menu in the upper right and choose Download. On my system, I am now prompted for a location for the downloaded file. I navigate to my Pictures\yyyymm folder. If your browser doesn’t prompt you for the location it is probably automatically downloading your picture to your Downloads folder. You need to change the Browser’s (Chrome) settings so that it asks you for a location for each download. Here is a help article on how to change download settings.
  3. Repeat #2 for each ‘keeper’ as I browse thru my pictures. This is a bit cumbersome, but I find it the best of my available options. I regularly browse thru my recently added Google Photos anyway. Just be sure to do it from the computer and download the ones I like best. Not too bad.

Method 4: Use Picasa to Download Albums
June 2018: Picasa NO LONGER WORKS WITH ANYTHING ONLINE

If you have made albums using Google Photos, you can use Picasa on your computer to download those albums.
  1. Using Picasa on your computer
  2. File->Import from Google Photos
  3. Check the box to Import Selected Albums then Choose the Album from the list presented
That’s it! This downloads the actual pictures, not a .zip file. Pretty slick, BUT there are two problems:
  1. It only downloads pictures not already on your computer. If you have already used any other method to get some, or all of the pictures, then the imported album will be incomplete.
  2. It doesn’t ask for a location. It automatically downloads your imported albums to a special location. In Picasa, you will see a collection at the left sidebar called “Web Albums.” On your hard drive, it will have a numeric identifier like: C:\Users\Chris\Pictures\Downloaded Albums\104655811483131756227\Blackbeard's Dive Trip Oct 2015

Use Picasa to Create Albums

I still like to use the Picasa tools to create my Web Albums. There are 3 things that I can do with this method that I can’t do by creating Albums with the Google Photos tools
  1. Captions: When I add a caption using Picasa, that caption is part of the metadata of the picture. When I upload that picture to Google Photos, the caption becomes the Description. This doesn’t work the other way around: when I add a description in Google Photos and then download the picture, the description is lost, there is no caption.
  2. Watermarks: Picasa has an option to add a watermark to all uploaded photos automatically, so I can add © GeeksOnTour.com to every picture.
  3. Public Albums: My purpose to creating albums is to share those pictures. When I use Picasa to upload an album, I have the option to make that album Public. There is no such option with Google Photos (yet.) When I have a library of public albums, I can still use my Picasa Web Albums link (picasaweb.google.com/chrisguld) to let people see ALL my shared photos.
There is one drawback to using Picasa to upload – it does not (yet) support the new “High Quality” file size. To keep your unlimited free storage, you must select the size called “Best for Sharing” which shrinks your photo to 2048 pixels on the longest side. For me, this is not a problem. 2048 pixels is plenty big enough to view the picture online and that is my purpose.
Please leave a comment to let me know which method you prefer, or any questions you have.