Translate

Showing posts with label #LearnGooglePhotos. Show all posts

Tuesday, August 4, 2020

Learn Google Photos - The Book tl;dr

The book, Learn Google Photos 2020, will be released on September 1. At roughly 150 pages, you might say TL;DR - too long don't read, so we're writing this chapter by chapter summary for you.

More than a book

In addition to the printed book, or eBook, we are also building a companion web page. The first purpose of the page is to keep a running list of updates. Google Photos is changing all the time -- we will keep track. On that page we will also give access to tutorial videos and links to further resources for each chapter. 

Introduction

The introduction focuses on explaining the mission of Google Photos. It is not a better set of tools to manage your photos, it is a paradigm shift in the whole idea of managing your photos. It is one home for your entire lifetime of photos and videos with automated systems to manage them and making it easy to share and explore your best memories. The introduction also lists some frequently asked questions with answers to jump-start your learning.

Chapter 1: Your Google Account

You must have a Google Account to use Google Photos. If you have multiple Google accounts be clear which one is used for your photos. Your username and password provides the lock and key under which your photos and videos will be stored. You get unlimited storage for free if you choose the "High Quality" size setting for your photos and videos. If you want to store them in original quality, you pay a small amount for storage and that makes you a member of Google One.

Chapter 2: Getting Started on Mobile Devices

Google Photos was built because people are taking so many photos and videos with their smartphones. It replaces the built-in gallery or photos app that came with your phone. To gather all the photos and videos from your phone and upload them to your Google account in the cloud, all you need to do is install the app and turn on the Back up & Sync setting. Then watch as the photos from your phone start to collect at Photos.Google.com. As you take new photos and videos, they will also be uploaded to your account. Now you can feel safe that you won't lose your photos even if you lose your phone. 
Once your photos are safely in the cloud, you can free up space on your phone by deleting them there. Other than having more space on your phone, you won't even know they're gone because the Google Photos app displays the cloud copy. But wait! Think about it, once you delete them from the phone, your only copy is in the cloud. You still need a backup. We highly recommend copying your phone's photos and video to one more location before wiping them from the phone.

Chapter 3: Collecting the rest of your life's photos and videos

If the only photos in your life are those you've taken with your phone, then you can skip this chapter. Most of us, however, have lots more. The goal is to gather all the photos and videos from your entire life in the one home that Google provides. If you previously used Picasa, then any photos you uploaded to Picasa Web Albums are already in Google Photos because they use the same cloud servers and Google accounts. For photos in Picasa that you did not upload, they are stored on your computer's hard drive. This chapter teaches how to upload past digital photos from computer hard drives and folders, camera cards, external hard drives, CDs, thumb drives and other cloud services like Facebook or Dropbox or OneDrive. This chapter also teaches some easy techniques for digitizing old prints and slides so they can be collected into your Google Photos. 

Chapter 4: Getting around in Google Photos

Google Photos is actually 3 things: 
  1. Website and cloud storage space (photos.google.com)
  2. Android App
  3. iOS App
This chapter teaches how to navigate the menus and buttons in all three interfaces. We answer the questions, "What does this button do?" For the most part, anything you can do in one, you can also do in the other 2, but there are some minor differences. 

Chapter 5: Exploring your photo library

This chapter explains how your photo library is organized by date. We explain how to use the Archive and Device Folders. There is no need to know exactly where a photo is because you can use search to find most anything. You can browse a map, and see photos in their locations. Want to see all the photos of your grandson? Just look in the People section where Google automatically sorts photos by faces. Learn how to select images for adding to albums, how to delete photos, how to add descriptions and view other information (metadata) for your photos, how to play a slide show, and how to use Google Lens.

Chapter 6: Keeping your memories safe

Doesn't it feel good now to have all your photos and videos in one place? It is indeed wonderful, but if living with technology teaches us anything, it's to have a backup. Don't keep all your memories in only one basket.
  • Be careful with delete! Make sure you understand what you are deleting before you use it. Are you deleting the device copy, the cloud copy, or both? If you do delete by mistake, this chapter teaches how you can undelete if it has been less than 60 days. 
  • Photos and videos stored in your Google account are extremely safe, but as we all know, stuff happens.  This chapter teaches how to copy your photos to one more cloud storage service, just in case. 
Everything is uploaded, you also need to know how to download. 
  • On your phone, sometimes it is necessary to have photos stored locally on the device. You can download individual photos from the cloud to your device. 
  • On your computer, you should download at least your important albums. This chapter teaches how to do that.
  • Google provides a tool called Takeout that will download your entire library of photos and videos. It does it using multiple .zip files however and can be very confusing. It does not preserve your albums.

Chapter 7: Editing to improve your photos

It doesn't matter which device you use, phone, tablet, or computer, you have the tools to make your photos look better. This chapter teaches how to use Crop, Filters, Light and Color options, and Pop. For video, you can rotate, stabilize, trim, and export frame. Snapseed is also covered in this chapter. It is a separate, free app by Google, for more sophisticated editing. It works in partnership with Google Photos. The sample below is using editing features within Google Photos.

Chapter 8: Organizing with Albums and Favorites

This chapter teaches all about making and using albums. Albums are used for all the following reasons:

  1. Showcase your good photos and videos
  2. Collecting your chosen photos in special categories
  3. To tell a story, you can add text blocks and maps.
  4. For sharing groups of pictures
  5. Collaborating with others for a group album
  6. To use for digital photo frames
  7. To use for making printed photo books
  8. To use for making movies or animations
  9. To use for downloading backups
  10. Making a Favorites album by starring photos
  11. Auto updating albums (aka Live Albums)

Chapter 9: Sharing

This chapter covers all the different techniques for sharing photos. Which ones you use depends on who you are sharing with and why. 
  • Using a link you can share one photo or any number of photos and videos with any number of people. They don't even need to have a Google account, anyone with the link can open it and see your photos. 
  • If you want to be more exclusive, you can share with specified individuals if they do have a Google account. 
  • Shared albums are wonderful for allowing groups of people to share with each other. 
  • Shared library is used if you want one partner to have access to your entire library.
  • Sharing to another app is how you send photos via email, text, or post to social media like Facebook or Twitter.

Chapter 10: Surrounding yourself with your photos and creations

Here's where we reap the rewards of having our life's worth of photos and videos in one place. 
  • Memories section: Google encourages us to reminisce by surfacing memories at the top of the mobile apps. In the Recent Highlights segment, you may see creations that Google has made for you. Sweet little movies are compiled from your photos and videos, collages, and animations. 
  • Next in the memories section, you can browse thru photos from this week 1 year ago, 2 years ago, and as far back as your photos go. 
  • Creations: You can make creations easily. Combine any photos and videos into movies, animations, and collages that will put a smile on your face and anyone you share with.
  • Printing: built right in to Google Photos is a Print Store. You can order individual prints if you want, but the real beauty is easy, fast, and inexpensive it is to order photo books and mounted canvas wall prints. 
  • You can have your television displaying your memories like a big screensaver. You can also have slideshows constantly running on smaller screens of smart displays.  Pick whatever albums you want to display on different screens. Your whole house can be filled with your memories being displayed. It can even happen at someone else's house. If you share photos of your kids with your mother, she can have those photos automatically displayed on her TV or smart display.

Chapter 11: Troubleshooting and getting help

If you can't find your photos, or something just isn't working as it is supposed to, there are a few troubleshooting techniques you can use. If that doesn't work, you can get help thru the public support forum. If you are a Google One subscriber, you can get phone help.

Chapter 12: Apple Photos and iCloud vs Google Photos

Apple Photos is the photo gallery or camera roll app that comes with your iPhone and iPad. It is also a more full-featured program that comes with Mac computers.
iCloud is Apple's cloud storage and synchronization service. You can use Apple Photos with or without iCloud. Apple Photos with iCloud performs roughly the same service as Google Photos with one major exception when it comes to deleting photos.
  • with Google Photos you can delete the device copy of a photos and still keep the cloud copy
  • with Apple Photos you cannot. Apple photos job is to keep all your Apple devices in sync. Add a photos with one device, it gets added to all. Delete a photo with one device and it is deleted from all - including the cloud.
  • if you delete photos using Google photos, it is deleting the device copy. That deletion will be noticed by iCloud and the deletion will be synced to iCloud and all Apple devices.
This chapter explains this in more detail and compares some of the features of both apps. We let you know whether it's ok to use both at the same time, or if you should stick to Google Photos and turn iCloud off. 

Chapter 13: My favorite features

To wrap it up, let's get back to remembering what makes Google Photos so great. I list 9 different favorite features:
Chris Guld is President and Teacher-in-Chief at GeeksOnTour.com. She has been in computer training and support since 1983. She is now a Product Expert for the Google Photos Forum, owner of the LearnGooglePhotos.com blog, and author of Mrs. Geek's Guide to Google Photos. 
She loves to teach! If you want to learn, you’ve come to the right place.

Saturday, March 7, 2020

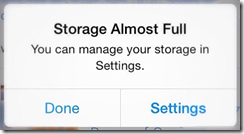
If I get free, unlimited storage, why is Google Photos telling me to buy storage for $1.99/mo?

It may look like Google is telling you to buy 100 GB for $1.99/mo, but what they're actually doing is just offering it to you.

If you choose the High Quality setting, you do get free unlimited storage, you don't need to buy anything.

High Quality means that Google stores up to 16 megapixel photos and 1080p videos with an extra compression to reduce the file size. My cameras all take photos less than 16 megapixels, so this is fine with me and I like the reduced file size. 

Your Google Storage Allotment

Google gives everyone 15GB of free storage space. Keep in mind that your Google storage is shared among Gmail, Google Drive, and Original quality Google Photos. You can see how much you are using by going to MyAccount.Google.com and be logged in with your Google account. 
You will see sections for privacy, security, and Account storage. In the account storage section, click the link to "Manage storage" and you will see your total allotment as well as the amount being used by Drive, Gmail, and Photos.

What is Google One? Think phone support.

If you choose to buy 100 GB for $1.99/month, you become a member of Google One. That is simply what Google has chosen to call it when you pay for storage rather than just using the free allotment. 

If you become a member of Google One, there are a few other benefits. You get support from Google, even for the free products like Google Photos. Think about that, for $2/month you get phone support. You can talk to a real human being. I've heard reports ranging from "solved my problem quickly" to "totally useless." But, that is the nature of phone support in general, right? I think it's pretty amazing to get phone support for $2/mo.

My Google Photos setting changed to Original

When you become a Google One member, Google apparently assumes you want to use that storage for your photos and the default selection for file size changes from High Quality to Original. It took me a while to realize this. I've always chosen to store my photos in High Quality. I am now paying $2/mo for the Google One membership, but my reason is to have access to phone support. I don't know how long I will continue the membership and I still want my photos to be stored for free with the High Quality setting. My current storage stats show that Google Photos is taking up 2.81 GB.

I found the culprit by checking my iPhone Google Photos settings. I had uninstalled and reinstalled the program, not noticing that the default size setting had changed to Original. I have now set it back to High Quality, but what about the photos that are already stored at High Quality?

Recover Storage

There is a button that will review all your stored photos and, retroactively, compress them to High Quality. It's called Recover Storage, and you'll find it on the Google Photos settings on the web version. Here is a video on how to use it.


Billed thru iTunes?

When someone showed me an email that iTunes was billing them for Google Photos storage, I thought it was a scam. Google storage would be billed thru Google. Since when was Apple doing Google's collections for them?!? But, apparently it is true. You can sign up for that $2mo 100 GB using your iPhone and your Apple ID.
If you think an email about an iTunes charge may be a scam, here is Apple's help for identifying legitimate emails from them.


Chris Guld is President and Teacher-in-Chief at GeeksOnTour.com. She has been in computer training and support since 1983. She is now a Product Expert for the Google Photos Forum, owner of the LearnGooglePhotos.com blog, and author of Mrs. Geek's Guide to Google Photos. 
She loves to teach! If you want to learn, you’ve come to the right place.

Wednesday, February 26, 2020

How to add text with a solid background to a photo using Google Photos - 610

It was a long time in coming, but Google Photos now can add text right to a photo. At least, the Android version of Google Photos can do that. It's called the "Markup" tool and it's pretty simple.

Even if you know how to add text to photos with Google Photos, yuo should watch this short video because I add a very important little tip!

Notice how the words in the picture  have a dark background. That is SO important to allow the words to be readable. I've found a way to accomplish it with the new Google Photos markup tool.


Chris Guld is President and Teacher-in-Chief at GeeksOnTour.com. She has been in computer training and support since 1983. She is now a Product Expert for the Google Photos Forum, owner of the LearnGooglePhotos.com blog, and author of Mrs. Geek's Guide to Google Photos. 
She loves to teach! If you want to learn, you’ve come to the right place.

Friday, January 4, 2019

Google Photos is not a social network, or is it?

I recently read an article by Mike Elgan about how he plans to use a Google Photos album to keep in touch with friends and family instead of Facebook. He calls it How I replaced Facebook with Nicebook. "Nicebook" is the name he gave to his Photo album that he invites anyone to look at and comment on.

Interesting, but I don't think it's going to work.

You know I love Google Photos, and I definitely use albums to organize my photos. I make an album for every month as a matter of course. This allows me to easily browse thru my photos from any given time and remember where I was and what I was doing. I put links to these albums on a public blog page so anyone can see them if they like, but I do it for me. Really, does anyone else care about my pictures like I do?
I make an album for every month. To learn how I do this, watch episode 159 of our YouTube show

Google Photos is GREAT for sharing albums of trips and events

48 people followed our Italy album as it grew 
I share albums of special trips or events. In 2017, when we spent a month in Italy and Croatia, I invited anyone who reads my Facebook posts, or our Geeks on Tour newsletter, to "join" our photo album. For anyone who did that, two things happened: 
  1. They got notified any time we added new photos to the album, which was daily. This way they were following along, in almost real time.
  2. They could comment on any photo, or the album as a whole, and we could comment back. This provided a conversation with our followers.
Anyone can view the album and all the photos and videos contained in the album. Only if you have a Google account and are signed in can you "join" the album. Then it will show up in your Google Photos app in the Sharing section.
This month, Jim and I are headed off to Australia and then New Zealand and, once again, we will share the album in advance so anyone can follow along. It worked great in 2017 and I expect it to work great in 2019. We will be connected, photo by photo, with anyone who is interested. They can comment to us and we can comment back without involving any other social network besides our own photo album.

We do not allow collaboration on our shared albums

Realize that I am not talking about a group shared album. It's called "collaboration" when you set up an album where several people can contribute photos and videos to the album. This is great for weddings, or sports events, or group trips, where one person creates the album and invites the others in the group to add their photos as well. When you use this feature, you don't want just anyone to get hold of the link. If hundreds, or thousands of people have the link - they are all able to add their photos and videos. I've known people to test this, and it doesn't take long before you have some very undesirable content in the album. Then it becomes an unwelcome job to monitor the album and block the offending users.

Shared Albums vs Facebook


Shared Albums

Facebook
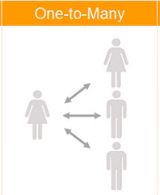
I see my shared album as a one-to-many communication tool, where the "one" is me and my photo album and the "many" is all the people who click the link to view it, and perhaps to join it.
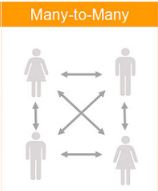
Facebook is so much more than that. Facebook is many-to-many. I use Facebook because so many of my friends are there. In just a few minutes each day, I can catch up with my friends and see what is going on with them. I may not even post anything about myself. A shared album can't do that. Besides, how would I let people know about the shared album if it weren't for Facebook! That's where I post the link where all of my friends will see it. The shared album means I can post less on Facebook. An occasional photo will do, along with the link to the album for anyone who wants to see more.
I applaud Mike Elgan for thinking outside the box with Google Photos, and I joined his album so I can follow along. But I can't give up Facebook yet. What about you?


Chris Guld is President and Teacher-in-Chief at GeeksOnTour.com. She has been in computer training and support since 1983. She is now a Product Expert for the Google Photos Forum, owner of the LearnGooglePhotos.com blog, and author of Mrs. Geek's Guide to Google Photos. 
She loves to teach! If you want to learn, you’ve come to the right place.

Tuesday, July 31, 2018

How to use Google Photos Editing Tools: Crop

Do you think you can't get a good picture of that bald eagle with your smartphone? Take it anyway! You may be surprised at how good you can make it look with just a couple of tweaks from Google Photos editing tools.

Zooming with the camera

I used to teach people to NOT use the zoom feature on smartphone cameras. It's just a digital zoom which is the same as cropping after taking the picture. However, smartphone cameras have improved over the years, even simple digital zoom works better, and many of the newer smartphones have a second lens which is a true optical zoom. If you have a phone with 2 rear lenses, like my iPhone 7 Plus, you can tap the 1x icon on your camera screen (it changes to 2x)  to take advantage of the optical zoom capabilities of your phone. Even if you don't have the zoom lens, you can use 2 fingers on the screen to zoom, but don't go too far with this technique because it's hard to hold the camera still. You can accomplish the same thing (digital zoom) after taking the shot by cropping the photo with Google's editing tools.


Using Google Photos Crop tool

To use the crop tool:

  1. Open the photo and tap/click the Edit button 
  2. Now you will see all the editing tools, tap/click the crop tool 
  3. You should now see white markers at each corner, you can drag them in closer to the eagle.
  4. Tap/Click Done, then Save. You might want to try an Auto filter before saving to see if it improves the exposure and color of the photo.
Now, I admit that this picture isn't going to win any awards. Don't try printing it because it is way too low resolution after cropping it down to a fraction of the original photo. But, I love having this eagle photo to show people using my phone. I'm glad I took the shot.

Reasons to use the Crop Tool

Most every photo can be improved with a simple crop. It can cut out extraneous items in the photo and get closer to your subject. It can also change the aspect ratio of the photo. Aspect ratio means the ratio of the height to the width, from 4X6 to square, for example. If you have specific needs for the aspect ratio, you can click/tap on the crop-ratio button. It will give you the choices of: Free, Original, Square, 16:9, 4:3, or 3:2

Here are some examples of what cropping can accomplish:


The crop tool can also straighten a crooked photo by dragging the 0 point.
If you are a GeeksOnTour.com member, be sure to go thru the Learning Guide for editing with Google Photos and Snapseed. Also, here are some tutorial videos on editing


Chris Guld is President and Teacher-in-Chief at GeeksOnTour.com. She has been in computer training and support since 1983. She is now a Top Contributor for the Google Photos Forum, owner of the LearnGooglePhotos.com blog, and author of Mrs. Geek's Guide to Google Photos. 
She loves to teach! If you want to learn, you’ve come to the right place.

Wednesday, February 28, 2018

Google Photos: Everything you need to know

I wrote a book about Google Photos. It's titled Mrs. Geek's Guide to Google Photos. The subtitle is "Your lifetime of photos, effortless and free." I keep thinking, if Google Photos is so effortless, why do I need a 100+ page book to teach how to use it?
I've come up with these 14 points as all you really need to know. The links to videos are for GeeksOnTour.com premium members. Please leave a comment if you think I left something out, or got something wrong. If you take a lot of photos and wish that they were all together and safe so you never had to worry about them - Google Photos is truly the best option.
Member Tutorial Videos:
497.GP-Install on iOS
496.GP-Install on Android
490.GP-Backup Complete
500.GP-Install Backup and Sync for Windows
476.GP-Manual upload from smartphone
475.GP-How to upload photos from an external hard drive
474.GP-Manual Upload from Mac Photos

  1. You need a Google account to use Google Photos. Make sure you know your username and password.
  2. To use Google Photos on a mobile device, download the free app from the App Store (iOS) or Play Store (android)
  3. Once the app is installed, open it and accept the default settings: 1. Your google account 2. High Quality file size 3. Only upload when on Wi-Fi
  4. You will immediately see the photos on your device. If your device is connected to Wi-Fi, it will start uploading (copying) all those photos to your account in the cloud.
  5. Your photos are not “in Google Photos” until the backup is complete. You must open the app to view the progress and watch for the message “Backup Complete”
  6. Once you see “Backup Complete” you can remove photos from your device and still see the Google Photos copy. But, DO NOT use the trash can for this, that erases the photo from everywhere – device AND cloud.
  7. Android note: your device may have photos in “Device Folders” other than the camera. They will not be included in Google Photos until you: menu, device folders, select the folder and turn on Back up & Sync.
  8. iOS note: if iCloud Photo Library setting is on, leave it on until Google Photos backup is complete. Do not delete photos or FREE UP Space using Google Photos while iCloud Photo Library is on because it will also delete them from iCloud.
  9. Optional: I recommend a second cloud backup service like One Drive, Dropbox, or Amazon before removing photos from your device. That’s a true backup.
  10. To remove all photos from your device and leave them in Google Photos – use the 3-line menu and FREE UP SPACE (iOS: Do not delete photos or FREE UP Space using Google Photos while iCloud Photo Library is on because it will also delete them from iCloud.)
  11. To use Google Photos on a computer there is no software to install, just go to the website, Photos.Google.com and sign in with your Google account.
  12. To upload pictures from your computer to Google Photos manually, you have 2 choices: 1. Drag and drop from computer folders to Google Photos website 2. From Google Photos website, use the Upload button.
  13. To upload pictures from your computer to Google Photos automatically, install the Backup and Sync app and set preferences to specify what photos you want uploaded and how you want them synced.
  14. All photos uploaded to Google Photos, from whatever device, will be included in the “Library.” The photo library is one giant stream of photos in order by date taken. There are NO folders.

The 14 points above are everything you need to know to successfully store your lifetime of photos for free, forever. Once they’re there, there is so much you can do with them!


  • Explore: Google automatically groups your photos by People, Places, and Things. It is so much fun to explore and find photos you’ve forgotten. You can also use Search, and find photos without the need to tag them first.
  • Edit: Google Photos has built in editing tools that can, so easily, make your pictures look better. It also works together with the Snapseed app for hundreds more, professional, editing tools.
  • Creations: it’s easy to make your own Albums, Collages, Animations, Movies, and even printed Books.
  • Sharing: your library of photos is private, for your eyes only, but Google Photos makes it easy to share the ones you want.
Here is one of our "What does this button do?" live YouTube shows: What's New with Google Photos

Please leave a comment if you use Google Photos and learned something in this article.

Continue your Education with Geeks on Tour by subscribing to our Newsletters!
Chris Guld is President and Teacher-in-Chief at GeeksOnTour.com. She has been in computer training and support since 1983 and owned a Computer Training Center called Computer Savvy from 1983-1996. She was one of the first WordPerfect Certified trainers in 1986; President of the International Computer Training Association in 1993; Author of the Beginner’s Guide to Picasa and the PicasaGeeks.com website. She is now a Top Contributor for the Google Photos Forum, author of Mrs. Geeks Guide to Google Photos, and owner of the LearnGooglePhotos.com blog. She loves to teach! If you want to learn, you’ve come to the right place.

Wednesday, December 6, 2017

Taking a trip? Don’t leave home without Google Photos on your phone.

20070414_port-everglades-18“I’m going on a 3 week cruise starting tomorrow and I’m afraid my phone will run out of space for taking photos.”

Don’t let that happen to you! And, don’t delete photos off your phone without making sure they’re backed up first!

We got together with our friends, Chris and Charles, the evening before they were to board a cruise ship for 3 weeks. I looked at Chris’ phone and saw that she only had a few hundred megabytes of free space on her phone. At that rate, she wouldn’t last one day of taking pictures before getting the dreaded, “Device Full” error message would appear. I looked in Settings and found that over 8 Gigabytes were in use storing nearly 4,000 pictures and videos. She needed to get serious about deleting them!

“I have them backed up on my computer, so it’s OK to delete them from the phone,” she said, “but, I don’t want to delete them all because I like looking at them on the phone. It’s just too much work to decide which to delete and which to keep, so I don’t do it.”

I told her if she used Google Photos, she can delete the photos from the phone, but still see them all using the Google Photos app after the pictures were uploaded to her Google account online. With the Google Photos “Free Up Space” command, all the photos can then be removed with one click. “Let’s do it!” she said.

How to prepare your phone for a trip:

  1. googlephotosInstall Google Photos app on your phone, get it from the App store on iOS or the Play store on Android. It’s free.
    - turn on “Backup and Sync” setting
    - make sure the Google account listed is correct for where you want your photos stored
    - make sure the upload size is High quality (free unlimited storage)
  2. Watch the photos being backed up! Just because you see photos in the Google Photos app does not mean they’re in your Google Photos account, it takes time. The app initially views the photos on your phone. Only when you see “Backup Complete” are you safe to delete them from the device. You may need to connect to a Wi-Fi hotspot because it can use a lot of data to do the backup.

  3. Verify that you can see your photos in your account online. Go to Photos.Google.com and log in with the same Google account used for the app on your phone. You should see all your pictures there.
  4. Now you can delete the photos. Don’t use the trashcan, that deletes from everywhere. Use the Google Photos app on your phone, tap the 3-line menu, Free Up Space. You will see a message about how many photos will be deleted and how much space will be freed up. If you are using an iPhone, and you have iCloud Photo Library turned on, realize these photos will be removed from all iCloud devices as well.

It took all night for Chris’ 4,000 pictures to be backed up. When we looked in the morning, the Google Photos app reported 110 photos remaining. It just took another half hour or so for those to complete. Using a computer, I had Chris sign in to her Google Photos account to prove that we could see her photos online that had just been backed up from her phone. Yes! All photos were there, so I had her open the Google Photos app, and tap the Free Up Space option. Seconds later, she had over 8 GB of free space, plenty for a few thousand pictures.

Bon Voyage Chris and Charles! I can already see from your Facebook photos that you’re having a good time!

Geeks on Tour premium members may also want to view these videos:

Saturday, August 12, 2017

Can’t take a good picture from a moving vehicle? Sure you can.

It is difficult to take a good picture while in a moving vehicle. You can’t take the time to properly frame the shot, and when you’re bouncing around you’re bound to get things a little crooked,  but – take it anyway! It’s a piece of cake to make that picture better after the fact with just a few clicks using Google Photos editing tools. My husband and I travel all over the country in our RV (see our travel maps here.) He does the driving, so I can snap pictures. I love the memories I have from the pictures snapped thru the window.
Sometimes I’m using my iPhone, sometimes an Android device, and sometimes a “real” camera, my Canon T3i. It doesn’t matter what camera I’m using, all my photos go to the cloud in my Google Photos account. Once they’re there, I can using the edit tools to make them look better.
These edit tools are available on my iPhone, on my Android mobile devices, or on my computer at Photos.Google.com. You open any photo, then click the edit button. Note: the edit button has recently changed on the computer and the Android version, instead of the trusty old pencil icon - image - it is now the same as the adjustments ‘slider’ icon - image. Either way, it takes you to the editing tools: Filters, Adjustments, and Crop/rotate. Crop and rotate (straighten)image is probably the most important tool in the following examples. All of these editing features are detailed in previous articles in this website:
  1. Straighten
  2. Crop
  3. Filters: Auto, Metro (no article yet, but it’s in the Editing chapter of the book.)
  4. Pop
  5. Vignette
If you want to try these yourself, here are the original photos: https://goo.gl/photos/qMsRbq6DF2hcTXjM7


As Taken After a few clicks with Google Photos
Editing tools
State sign at border
image
Crop, Straighten, Auto color correct, and a little Pop
image
New York farm
image
Crop, Auto-color, a little pop, and a little Vignette
image
Mt. Hood
image
Straighten, Crop, Auto-color, a lot of Pop
image
Toronto Skyline
image
Straighten, Crop, Metro Filter, Pop
image

Friday, June 23, 2017

My iPhone is full of photos, can Google Photos help?

imagePeggy asks:  I’ve been taking photos with my iPhone for quite some time and have taken several hundred photos. The other day, I connected my iPhone to my Mac and now  I have over 4,000 photos on my phone. I’m getting a message that my phone’s storage is almost full. How did that happen? I don’t want to lose these photos, but I don’t need them on my phone. If I delete the photos, I understand that they will be deleted from my computer and iPad  also. Can Google Photos help?

What happened?

It sounds like your setting for Apple’s iCloud Photo Library got turned on. That means that Apple will keep all of your devices in Sync. Every photo will be on your computer, your iPhone, and your iPad. It is true, if you now delete any photos from your phone, they will be deleted from your other devices. Google Photos, on the other hand, will back up your photos and allow you to delete them from the phone.

Yes! Google Photos can help, but pay attention to your iCloud Photo Library settings

iCloud Photo Library is Apple’s solution for Backup and Sync for all your photos. It works differently than Google Photos Backup and Sync. Using them both will use up more iPhone storage space, and it will get complicated because of the way they handle deletions. With one exception,  I recommend using Google Photos and not iCloud Photo Library. The one exception is if it is important to you that the photos taken with your iPhone get automatically copied to your Mac’s hard drive, then you’ll want to stick with iCloud. With Google Photos, you can view your photos from your Mac (or any computer) by browsing to Photos.Google.com. They are not stored on your computer’s hard drive.

  • On your iPhone:  go to Settings, iCloud, Photos
  • Photo Stream, and iCloud Photo Sharing don’t matter, they can be either on or off
  • Look at iCloud Photo Library. If it’s Off, great! leave it off. Go to next step: Install Google Photos
  • If iCloud Photo Library is On, also notice if the box is checked for “Optimize iPhone Storage”
    • If “Optimize iPhone Storage” is not checked, you can turn off the iCloud Photo Library setting now. This will stop the iCloud Backup and Sync while leaving photos on your phone. If you delete a photo after turning it off, it will not be deleted from your other devices. Go to next step: Install Google Photos
    • If “Optimize iPhone Storage” IS checked, then turning off the iCloud Photo Library setting will stop the iCloud Backup and Sync, AND REMOVE ALL PHOTOS FROM YOUR PHONE. It won’t touch the photos on your Mac or iPad. Leave the iCloud Photo Library setting ON until the Google Photos backup is complete. Go to next step: Install Google Photos

Install Google Photos, turn on the Auto Backup & Sync feature, and wait until all photos are backed up. If you have thousands of photos on your phone, this will take days. Once they are all backed up to your Google Account, then you can turn off iCloud Photo Library and  use the Google Photos “Free Up Space” command to delete all photos remaining on your phone. Here’s the step by step:

  1. Install Google Photos from the App Store
  2. Sign in to your Google Account
  3. Turn on Auto Backup & Sync, connect to Wi-Fi, and leave the Google Photos app open on your phone while the backup is taking place. If you look at the assistant, you should see how many photos are remaining. Keep an eye on it.
  4. Wait until you see the message “Backup Complete” This may take hours or even days.
  5. Verify that all are backed up by viewing Photos.Google.com on another device like a computer
  6. Now you can turn off iCloud Photo Library. If your phone had the “optimize storage” setting checked, this will remove most photos from your phone. That’s OK. You’ll be using Google Photos from now on.
  7. Delete all photos from phone by using the Google Photos, 3-line menu, Free Up Space command.

You’ll still be able to see all your photos using the Google Photos app because it is viewing your photo library from the online copy. If you lose your phone, or should decide to remove the Google Photos app, you haven’t lost your photos. They are all stored in your Google account online and are visible from the website, photos.google.com or from any mobile device using the the Google Photos App.

iCloud Photo Library competes with Google Photos

You cannot Free Up Space until you disable iCloud Photo Library. You see, both Google Photos and Apple’s iCloud Photo Library serve the same purpose – copying your phone’s photos to cloud-based storage – but their philosophy is quite different.

  • Apple’s philosophy is hardware-based. Apple assumes you have an iPhone, an iPad, and a Mac computer and that you want all the pictures on all the devices. So, iCloud’s job is to keep all devices in sync. Add a photo to one, you add to all. Delete a photo from one, you delete from all.
  • Google’s philosophy is device-independent. Google thinks everything should be in the cloud, under the lock and key of your username and password, and all devices should access the content there. So, once the pictures are uploaded to your online Google account, you can delete them from the phone, or tablet, or computer.

Wednesday, June 7, 2017

Google Photos: Don't assume your photos are getting backed up

*Updated March 2020
  • It is Google Photos' job to back up your device's photos to your Google Account online. 
  • It's your job to verify that it gets done. 

There's nothing worse than thinking your photos are backed up, deleting them from your phone and then realizing they weren't backed up after all.
I'm currently traveling in Europe and taking hundreds of photos with my iPhone. I'm constantly checking that my photos are getting uploaded, and I'm not always happy with what I find. Whether it is a problem with the Google Photos app itself, or with the Internet connection, is hard to tell, but I often find that the backup process is stalled. Kind of like a clogged drainpipe, the upload process needs to be cleared and restarted. Using one or more of the following techniques, I have successfully ensured that all my photos got backed up / uploaded.

First Check your Backup Status

Tap on the account button in the upper right. You're looking for the message, "Backup Complete." You will other messages about the status of backing up. Something like "Backing up Photos: 321 items left" You will also see a progress bar that fills in blue from left to right. If you check this several times over the period of a day and see the same number left, then it's gotten stuck. It is not properly uploading your photos to your online account as it is supposed to do.
You may also see messages like "waiting for Connection" or "Backup and Sync is Off." These messages are very useful.

Check Photos.Google.com

Even if you see the message "Backup complete", I need to see for myself. Sometimes you see that all is complete, then a few minutes later it has more to backup?! The only way to know for sure that your photos have successfully made it to your Google account online is to use a computer (or any device other than the one that took the pictures) and see your photo library there. 
  • Using a computer browser, preferably Chrome, go to www.Photos.Google.com 
  • Make sure you are signed in to the same Google account used by your phone that took the photos. You can find that account address on your phone by going to Google Photos settings, Backup & Sync. The backup account will be listed there.
  • Look at your Photos library, check that the topmost photo is the most recent photo you took with the phone in question. Spot check previous photos
  • If your backup is not complete, read through the rest of this article for things to do to get the backup kick-started.

Your Internet Connection

First check your Google Photos settings under Backup and Sync. If "Use cellular data to back up ..." is off, then you must have a WiFi connection before any backup will happen. Even if your phone indicates that it has a good connection, you still need to test it by opening a browser window and visiting some website that would not be in your cache history. This is the only way to know for sure that your Internet connection is working well.

  • Open Chrome or Safari
  • Type in a website that you don't normally visit (I use msn.com or aol.com because they're short to type)
    • If the website comes up quickly, you're all set. Go on to Google Photos
    • If you see a log in screen, then you need to complete that process for the WiFi hotspot you're on, or find another WiFi hotspot
    • If the website just doesn't come up, or comes up very slowly then you know you have a very poor Internet connection and you'll just have to wait for later to get your photos backed up
  • Try resetting your Internet connection.
    • Turn on Airplane mode to disconnect from all communications
    • Turn Airplane mode back off - this forces your phone to re-connect and it usually gets a better connection. If not ...
    • Power off and Restart your phone
  • Find a better signal or WiFi connection. Just because you are connected, doesn't mean it's good enough to upload photos. Internet connections have 2 separate speeds: download and upload. Browsing the web uses the download capabilities, uploading photos needs the upload. I've found lots of Internet connections where the download is good, but the upload is not.

Google Photos App

If you know that your Internet connection is good, then there must be some problem with the operation of the Google Photos app. Things to try: 

  • Open the app, and leave it open, with the phone screen on and awake. On iPhone especially, the upload cannot take place in the background. This is quite annoying, but true. Even on Android, I find it is important to have the Google Photos app open for the upload to complete.
  • Force quit the app and re-open it. By "force-quit" I mean to open your recent apps screen on your phone (iPhone: double-tap the home button, Android: tap the multi-tasking button next to the home button) and tap the X on the Google Photos app, or swipe the app off the screen. Now, when you re-open the Google Photos app, it is forced to start fresh. See if it has started backing up now by checking your account button. You may have to wait a minute or two.
  • Manually backup some photos/videos: try finding a photo that has not been backed up yet. If you see a report that some photos were skipped, open one of those skipped photos.

     On iOS a photo that is still waiting to be backed up has a circular arrow icon. Select it, tap the 3-dot menu then Back up. If that operation completes successfully, check your assistant to see if backup has resumed. If not ...
  • Power off and restart your device.
  • If your remaining photos are still not backing up, try uninstalling the Google Photos app and then re-installing it. This will have no effect on your photos, Google Photos does not store your photos in the app itself. They are stored online.

Google Photos Help

Here is the official Google Photos help page all about Backup and Sync.

Make a Second Backup before Deleting

Before I use the Free Up Space command to delete the photos from my phone, I want one more layer of protection. Since the Google Photos copy of my pictures is my working copy, I don't consider that a true backup (see previous article: Google Photos is not a "Backup" of your Photos. I use the OneDrive app for this purpose. Other possibilities are Amazon Photos, Dropbox, Facebook, or copying to a computer via a cable connection.

6/13/17 Additional Notes

After several frustrating days of taking hundreds of photos and not getting them backed up I have reached a couple of conclusions:

  1. A stalled backup is almost always due to poor Internet connection. It's the upload speed that counts here, so even though a connection may be good enough to read your email, it may not be good enough to upload your photos. You need to find a better connection.
  2. Google Photos has some problem with iPhone Live Photos. When it comes to Live Photos, it stalls the backup process until you force it. You gotta watch it constantly and be ready to force quit the app and restart. At least that's the way I did it - it may also work to turn off Auto Backup then turn back on.

Chris Guld is President and Teacher-in-Chief at GeeksOnTour.com. She has been in computer training and support since 1983. She is now a Top Contributor for the Google Photos Forum, owner of the LearnGooglePhotos.com blog, and author of Mrs. Geek's Guide to Google Photos. 
She loves to teach! If you want to learn, you’ve come to the right place.

Thursday, April 27, 2017

Take Videos and Google Photos can make Movies

Do you ever use your smartphone to take videos?  ... on purpose? :-)
You should! These smartphone cameras are excellent video cameras. Just take 20 seconds of video occasionally and you’ll be glad you did. Then you can put together cool little movies with just a couple clicks using Google Photos. Your screen will look different during the movie making process in Android vs. iOS, but the steps below are the same:
  1. Select the photos and video clips you want included in your movie (up to 50)
  2. Click the + in the upper right and choose Movie
  3. Google Photos will automatically add music 
  4. That's it! If you see a Save button, tap that.
Here's one I just made of our travels from the west coast of California to Tennessee.


If you are a Geeks on Tour member, we have tutorial videos on this.
Movie Maker is not available on the Web version, just on mobile devices. See the list of supported devices here.

If you have Mrs. Geek's Guide to Google Photos, you will see movies covered in Chapter 10: Creations


Chris Guld is President and Teacher-in-Chief at GeeksOnTour.com. She has been in computer training and support since 1983. She is now a Top Contributor for the Google Photos Forum, owner of the LearnGooglePhotos.com blog, and author of Mrs. Geek's Guide to Google Photos. 
She loves to teach! If you want to learn, you’ve come to the right place.
Saturday, February 4, 2017

Google Photos Quick Tip: Make that Picture POP!

One of the Google Photos editing tools is called "Pop." What is Pop? Well, it's hard to describe. It brightens a photo, increases the color, brings out some of the detail in the shadows and adds definition and contrast.
  • Open a Photo in Google Photos
  • Tap the Pencil to get into edit mode
  • Tap the Adjustments Tool and you'll see Pop at the bottom
  • Drag the Pop slider to the right to increase Pop
This is one of those things where it's a lot easier to show you than to describe it. Here are some examples of photos with the original on the left and with Pop added on the right.

    Original Photo                                                           with Pop 


Realize that I picked good examples of pictures where Pop makes a difference. It won't always make a big difference, and sometimes you may not like what it does to a picture. But it's such a simple edit to try - why not? You can always drag the slider back down to the left where it started.


Chris Guld is President and Teacher-in-Chief at GeeksOnTour.com. She has been in computer training and support since 1983. She is now a Top Contributor for the Google Photos Forum, owner of the LearnGooglePhotos.com blog, and author of Mrs. Geek's Guide to Google Photos. 
She loves to teach! If you want to learn, you’ve come to the right place.
Wednesday, January 25, 2017

Got Questions about Google Photos?

Have you watched our "What Does This Button Do" show on Google Photos Frequently Asked Questions?

Here is the whole show, the Google Photos part starts at 10minute, 45 second point. 


Chris Guld is President and Teacher-in-Chief at GeeksOnTour.com. She has been in computer training and support since 1983. She is now a Top Contributor for the Google Photos Forum, owner of the LearnGooglePhotos.com blog, and author of Mrs. Geek's Guide to Google Photos. 
She loves to teach! If you want to learn, you’ve come to the right place.

Saturday, January 21, 2017

Quick Tip: View Google Photos Year at a Glance

I've heard people lamenting the fact that they never have enough time to organize all their photos. They want to see them grouped by year and month, Right now, they have them on their computer in all sorts of different folders they've created over the years. How can they start all over, clean up and just view them by date.

Google Photos is the answer. Upload your pictures to your Google Photos account (unlimited free storage forever) and they will automatically be viewable by date. While viewing your library of photos, you can pinch the screen on your phone or tablet and see them grouped by year, then month. No work at all on your part!

Here is a video clip from our weekly smartphone class that shows you what I mean ...


Chris Guld is President and Teacher-in-Chief at GeeksOnTour.com. She has been in computer training and support since 1983. She is now a Top Contributor for the Google Photos Forum, owner of the LearnGooglePhotos.com blog, and author of Mrs. Geek's Guide to Google Photos. 
She loves to teach! If you want to learn, you’ve come to the right place.