I hope you've discovered that your smartphone camera takes great videos, and videos add so much to the experience of your memories. Even just 15 second clips, combined with your photos, can bring your memories to life in delightful ways. But, any time you are hand-holding your phone while taking video, you run the risk of it coming out shaky.
If you are using an Android device and the Google Photos app, you're in luck. There's a simple, one-click option to "stabilize" your video. Just open the video and tap on the edit button below the video - the middle icon. That will open up the video editing tools.
All you need to do is tap the button at the left called stabilize, and Google Photos will do all the rest. Notice that you also have the option to trim the beginning or end, and to rotate the video. When you're done, tap Save a Copy in the upper right. Note: this feature does not exist on the iPhone version of Google Photos. I hear that the app Emulsio is supposed to do the same thing.
The results
The results of using the Stabilize function with Google Photos app on AndroidChris Guld is President and Teacher-in-Chief at GeeksOnTour.com. She has been in computer training and support since 1983. She is now a Product Expert for the Google Photos Forum, owner of the LearnGooglePhotos.com blog, and author of Mrs. Geek's Guide to Google Photos. She loves to teach! If you want to learn, you’ve come to the right place.
I used the Color Pop feature to make our
Geeks on Tour coffee mug stand out.
Have you ever wished you could make a photo of a flower, or a person, really stand out - with the main subject in color and the rest in black and white?
Now you can!
It's called Color Pop, and it is a new feature from our friends at Google Photos. It was announced along with Live Albums on Google's product blog on October 9, 2018. At the time it was only available on the Pixel phone, but it has arrived on the iPhone now as well.
Once you have a Portrait style photo, when you use the Edit button in Google Photos, you will see some new options. Color Pop is one of the filters you will see right away. Depth Editor is accessible with the Adjustments button. Here's a video that shows you all about it.
Chris Guld is President and Teacher-in-Chief at GeeksOnTour.com. She has been in computer training and support since 1983. She is now a Top Contributor for the Google Photos Forum, owner of the LearnGooglePhotos.com blog, and author of Mrs. Geek's Guide to Google Photos. She loves to teach! If you want to learn, you’ve come to the right place.
Do you think you can't get a good picture of that bald eagle with your smartphone? Take it anyway! You may be surprised at how good you can make it look with just a couple of tweaks from Google Photos editing tools.
Zooming with the camera
I used to teach people to NOT use the zoom feature on smartphone cameras. It's just a digital zoom which is the same as cropping after taking the picture. However, smartphone cameras have improved over the years, even simple digital zoom works better, and many of the newer smartphones have a second lens which is a true optical zoom. If you have a phone with 2 rear lenses, like my iPhone 7 Plus, you can tap the 1x icon on your camera screen (it changes to 2x) to take advantage of the optical zoom capabilities of your phone. Even if you don't have the zoom lens, you can use 2 fingers on the screen to zoom, but don't go too far with this technique because it's hard to hold the camera still. You can accomplish the same thing (digital zoom) after taking the shot by cropping the photo with Google's editing tools.
Using Google Photos Crop tool
To use the crop tool:
Open the photo and tap/click the Edit button
Now you will see all the editing tools, tap/click the crop tool
You should now see white markers at each corner, you can drag them in closer to the eagle.
Tap/Click Done, then Save. You might want to try an Auto filter before saving to see if it improves the exposure and color of the photo.
Now, I admit that this picture isn't going to win any awards. Don't try printing it because it is way too low resolution after cropping it down to a fraction of the original photo. But, I love having this eagle photo to show people using my phone. I'm glad I took the shot.
Reasons to use the Crop Tool
Most every photo can be improved with a simple crop. It can cut out extraneous items in the photo and get closer to your subject. It can also change the aspect ratio of the photo. Aspect ratio means the ratio of the height to the width, from 4X6 to square, for example. If you have specific needs for the aspect ratio, you can click/tap on the crop-ratio button. It will give you the choices of: Free, Original, Square, 16:9, 4:3, or 3:2
Here are some examples of what cropping can accomplish:
Chris Guld is President and Teacher-in-Chief at GeeksOnTour.com. She has been in computer training and support since 1983. She is now a Top Contributor for the Google Photos Forum, owner of the LearnGooglePhotos.com blog, and author of Mrs. Geek's Guide to Google Photos. She loves to teach! If you want to learn, you’ve come to the right place.
“Tag, you’re IT!” That’s what it’s like in today’s world on Facebook. Its called a “Challenge” and the latest one is about Black and White photography.
Seven days, seven black and white photos of your life. No people, no pets, no explanations.
I usually ignore challenges, I’m a party pooper, I don’t want to play. But, I liked this, I wanted to play. Here are my 7 pictures:
#1 Dolphin carving, black and white with vignette
#2 WWII Museum in New Orleans - just black and white with a little Pop
#2 Lighthouse: Vogue filter with a little Pop!
#3 Jackalope
#4 Roadtrek
#5 Union Station Kansas City
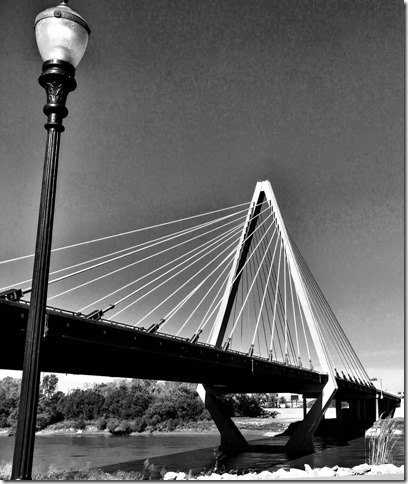
#7 Bridge over Missouri river in Kansas City. Also added some "Drama" using Snapseed
I Cheated
I did not use Black and White film! I didn’t set my digital camera to take black and white photos. I didn’t even use my phone’s capability to take photos in black and white mode. I took color pictures. A few of these, like the lighthouse, are even old color pictures I chose, then I used very simple editing tools to create the B&W images.
Here’s the lighthouse photo that I took back in September 2016, it’s in my Google Photos library.
To turn this into a Black and White photo, all I had to do was click to open it, then click the Edit tool: Now I see a number of “filters”, including 3 different black and white filters: Eiffel, Vogue, and Vista. Just try clicking on each one and see what it does. I like the Vogue the best, but then I also add a little Pop to sharpen the lines a bit.
The filter does the trick, but there’s another way I think I like even better. You can click on the Adjustments button: Yes, I know, it looks just like the Edit button above. Don’t ask me why, I liked the old pencil for the edit button personally! Anyway, once you’re in the adjustments, you’ll see a slider for color. If you drag that all the way to the left, you’ll remove all the color … that makes it black and white! Then, you can also add a little “Pop!” If you add more pop, you’ll get some of the color back, but in a special, muted way. Watch this quick video and I'll show you exactly how to do it.
Partial Black and White
If you watch the video, you'll see how Jim made this image of our musician friends, Victor and Penny, performing at Cafe Paradiso in Fairfield, Iowa. Notice how the photo is not completely black and white, but it's not really color either.
Want to give it a try?
Don’t wait for a challenge, just do it. You can post them on Facebook, or you can even leave a link here in the comments where we can see your black and white masterpieces. To get a link:
Select the pictures you want to share
Click the share button:
Get Link, Copy
Start a comment here, then paste the link
Leave a comment about which photo above that you like the best.
It is difficult to take a good picture while in a moving vehicle. You can’t take the time to properly frame the shot, and when you’re bouncing around you’re bound to get things a little crooked, but – take it anyway! It’s a piece of cake to make that picture better after the fact with just a few clicks using Google Photos editing tools. My husband and I travel all over the country in our RV (see our travel maps here.) He does the driving, so I can snap pictures. I love the memories I have from the pictures snapped thru the window.
Sometimes I’m using my iPhone, sometimes an Android device, and sometimes a “real” camera, my Canon T3i. It doesn’t matter what camera I’m using, all my photos go to the cloud in my Google Photos account. Once they’re there, I can using the edit tools to make them look better.
These edit tools are available on my iPhone, on my Android mobile devices, or on my computer at Photos.Google.com. You open any photo, then click the edit button. Note: the edit button has recently changed on the computer and the Android version, instead of the trusty old pencil icon - - it is now the same as the adjustments ‘slider’ icon - . Either way, it takes you to the editing tools: Filters, Adjustments, and Crop/rotate. Crop and rotate (straighten) is probably the most important tool in the following examples. All of these editing features are detailed in previous articles in this website:
It took me a while to notice that my new, wonderful, iPhone 7+ camera was not taking pictures that filled the screen. The iPhone’s screen’s width and height is known by it’s aspect ratio of 16:9. That’s nearly twice as wide as it is high. My computer screen is also 16:9, as is the most common display on YouTube, and newer TVs. So why does the iPhone camera only take pictures that are 4:3 – just a little bit wider than it is high?
This is a 4:3 ratio photo displaying on a wide screen – 16:9. Notice the black bars on either side?
This photo is widescreen format (16:9) so the picture gets the benefit of the whole screen.
My Android phone (Samsung Galaxy S5) has a camera setting for this. You can choose for the camera to shoot in wide-screen resolution or not.
There may be plenty of reasons for this of which I am unaware. All I know is that I want my pictures to fill the screen. If I can’t take them that way, I can crop them after the fact.
Using Google Photos
You can easily use Google Photos editing tools to crop to the 16:9 ratio. That’s what I did in the photo example above. The one on the left was how the iPhone took the photo, on the right is my cropped version.
Open the photo with Google Photos and click the pencil icon to edit
Click the Crop/rotate icon
Click the button to see the constraints for cropping
One of the Google Photos editing tools is called "Pop." What is Pop? Well, it's hard to describe. It brightens a photo, increases the color, brings out some of the detail in the shadows and adds definition and contrast.
Open a Photo in Google Photos
Tap the Pencil to get into edit mode
Tap the Adjustments Tool and you'll see Pop at the bottom
Drag the Pop slider to the right to increase Pop
This is one of those things where it's a lot easier to show you than to describe it. Here are some examples of photos with the original on the left and with Pop added on the right.
Original Photo with Pop
Realize that I picked good examples of pictures where Pop makes a difference. It won't always make a big difference, and sometimes you may not like what it does to a picture. But it's such a simple edit to try - why not? You can always drag the slider back down to the left where it started.
Chris Guld is President and Teacher-in-Chief at GeeksOnTour.com. She has been in computer training and support since 1983. She is now a Top Contributor for the Google Photos Forum, owner of the LearnGooglePhotos.com blog, and author of Mrs. Geek's Guide to Google Photos. She loves to teach! If you want to learn, you’ve come to the right place.
Drag slider to change slant of photo, notice the grid that appears to help you
Or use the Auto button to have it straightened for you
Chris Guld is President and Teacher-in-Chief at GeeksOnTour.com. She has been in computer training and support since 1983. She is now a Top Contributor for the Google Photos Forum, owner of the LearnGooglePhotos.com blog, and author of Mrs. Geek's Guide to Google Photos. She loves to teach! If you want to learn, you’ve come to the right place.
I went for a walk with my Mom the other afternoon. We have this favorite little park, and it was a gorgeous day. She’s walking pretty slow these days, so I had ample opportunity to take my phone out of my pocket and snap pictures. I showed her each picture I took and she would point out something else worthy of a shot.
Editing Pictures as you Take Them is FUN
I was excited to catch the duck in flight just as it came in for a landing. Then I looked at the photo on my phone and realized that you couldn’t even see the duck! It needed to be cropped. No problem, with no tools other than my finger and the phone, I tap on the little pencil that brings up Google Photos editing tools, tap the crop tool and drag a corner in closer to the duck while still leaving some of the lily pads in the shot. I tap the checkmark to signal that I’m done with cropping, Then, one tap on the Auto adjustment gives me a better look.
The second picture below just has an auto adjustment applied, and the third has a crop and auto adjustment.
Yes you can make a collage on your phone
I took a few more pictures, including a selfie of Mom and me that needed no improvement at all! It was such a nice day I wanted to share it with my friends on Facebook, but I didn’t want to post multiple pictures, so I decided to make a collage. Still using nothing but Google Photos on my phone:
I select 7 pictures
Tap the + button in the upper right
Choose Collage
Voila!
While viewing the collage, I tap the share button , choose Facebook, and post to Friends. I also tapped the + and added the collage to my monthly Web Album on Google Photos.
During this lovely one hour walk, I took pictures, enjoyed having Mom point out more pictures, had fun editing them, and shared a collage to Facebook, and added the day’s collage to my monthly album … all before even getting back to the car!
Google Photos has removed all the work and left only the play
In years past, I would have taken my digital SLR camera – a Canon Rebel T3i – and taken many of the same pictures. After getting home I would need to transfer them from the camera to the computer, decide where to store them, spend some time doing the editing, upload the best ones to the web, make the collage and upload that too. That would probably take me a half hour using Picasa, much longer with other software. A half hour may not sound like much, but when you multiply that times all the days and all the pictures I like to take – well, I think you get the idea. And, worse than the time it takes is when I didn’t take the time and never enjoyed my pictures or shared them.
I love playing with my pictures and trying out the different creations that Google Photos includes. And, at the end of the day, I’m done. All my photos are safely, and privately, stored in my Google Account in the cloud. I can delete them from my phone to free up space for taking more! I also have Microsoft OneDrive grabbing a copy of all my phone’s photos for the ‘belt and suspenders’ protection. This is all automatic.