Translate

Tuesday, November 18, 2025

Google Photos vs. Apple’s iCloud Photo Library

Apple-GoogleIf you use an iPhone, you are in the Apple world, and it seems logical to use the Apple photo solutions: Apple Photos and iCloud Photo Library. But, you also have the option to use the Google solution called Google Photos.

Have you been getting frustrated with constant messages by Apple that your iPhone is FULL, or that you need to buy more iCloud space?  Or are you simply confused about how your iPhone works with iCloud and your Mac or PC computer? Then you owe it to yourself to take a look at Google Photos. And, if you have an Android device, Google Photos is the logical choice. I am a Google fan-girl, and I use Google Photos for all my photos. I use an iPhone and Windows computer. I also have an iPad, an Android phone, and a Mac computer so that I can test how things work and be able to help people who use either system. After using Google Photos for the 3 years since it was released, and exploring the Apple iCloud system throughout that time, I think I’ve come up with the fundamental differences. First let me tell you how they are alike, and a little about how they work.

The Common Purpose

Both Google Photos and Apple’s iCloud Photo Library (different from Photo Stream) will store all of your photos online (aka “in the Cloud”) and allow you to view them all using a mobile device or computer. Both of them will automatically upload photos taken by your phone (or tablet) to your account online. Once all your photos are collected online, you can view them by going to a website (photos.google.com or iCloud.com) or using an App on your mobile device. Both Apple’s App and Google’s App are called “Photos.” But that’s where the similarities end.

The Fundamental Differences

  1. Devices Supported:
    Apple’s iCloud supports iOS, Mac, and PC, but not Android.
    Google Photos supports iOS, Mac, PC, and Android. So, if you have an Android device that you use to take pictures, Apple’s iCloud solution is off the table.
  2. Deleting Photos from Device:
    Apple’s iCloud Photo Library cannot delete from device. If you delete a photo from any device using iCloud Photo Library it is deleted from every other device. There is one exception – if you have installed iCloud Photo Library on your Windows computer, it will receive all new photos added, but will not remove photos deleted from elsewhere. In other words, there is no “Sync’ing” with iCloud photos on Windows after the initial download of the photos.
    Google Photos allows you to delete photos from the mobile device that took the picture, while leaving the photo available in the Cloud.
  3. Basic Cloud Philosophy:
    Apple: Apple uses the Cloud as a service to keep devices in sync. You can see the photos by going to iCloud.com, but you can’t do anything with them there.
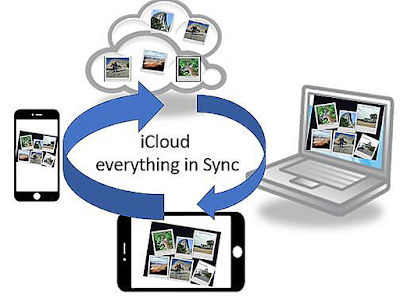
    If you delete from one, you delete from all


    Google
    : Google uses the Cloud as the end game. It is where all our our photos collect and live forever. You can edit and create with them there.
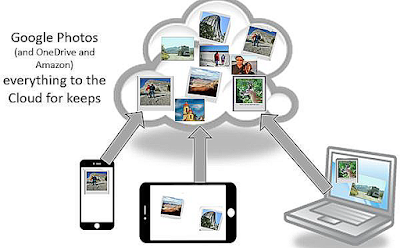
    After photos are uploaded to cloud, you can Free Up Space, removing photos from the device, while remaining in cloud
  4. Original vs. Compressed File Size:
    Apple Apple uploads your original size photo and allows you to shrink the copy left on your phone.
    Google Google allows you to shrink the photo that is uploaded and leaves the copy on your phone untouched. You can then delete the phone copy by using the command to Free Up Space. I prefer Google’s method since it takes less bandwidth to upload smaller photos online. It also means that your web photos will be faster to view and use. Google’s compressed size is called “Storage Saver” and it maintains up to 16 Megapixels of photo quality while compressing the file size by about half. These are plenty good enough quality for family memories, you can print a good 8X10. If I really want to keep the original, I can use another method to copy my original photos. Either another cloud service like OneDrive, DropBox, or Amazon, or use a USB cable and copy the photos to my computer.
  5. Cost:
    Apple gives you 5GB of free iCloud storage space. That fills up quickly with full size photos. For only $1/mo you can purchase 50GB more. That is certainly cheap enough.
    Google gives you 15GB of free storage. To buy more, is $1.99/mo for 100GB.
  6. Sync with Computer
    Apple iCloud
    sees your Mac computer as another sync’ed device as long as you have iCloud Photo Library turned on. Add a photo from any device and it adds to every other one, delete a photo from any device and it deletes from all. The Photos App has a version that runs on the Mac - so your Mac computer is like a mobile device in the way Photos works. You can, however specify original sized photos to be used on the Mac. Windows computers have a version of iCloud Photo Library which will download the pictures, but there is no Windows version of the Photos app, so there is no synchronizing.
    Google Photos only sees computers as a source of photos, computers are not sync’ed devices.** You can upload photos from a Computer to the Google Photos library in the Cloud, but the connection ends there. Deleting from the library or from the computer will not delete from the other. Editing a photo on either side will not update to the other. You can also download photos from your online library to your computer.

Moving to Google Photos

If you agree with me that Google is the better option, the next question is: How do I get my pictures from Apple’s iCloud Photo Library to Google Photos? You can Install the Google Photos App on your iPhone or iPad and turn on Backup and Sync. Assuming you have iCloud Photo Library turned on, this will upload your complete iCloud Photo Library to Google Photos. It starts with your earliest photos and works its way to the present. In my test it was able to upload 400-500 photos per hour. Be aware that this may be using your data! Check the option for using Wi-Fi only. Of course, your mileage may vary especially depending on your Internet connection speed!

You may question if using your mobile device is the best way. If you have your iCloud Photo Library set to “Optimize iPhone Storage” then you don't have the full size photos on your device. Is Google Photos using those and adding its own compression as well? No. My experiments and research indicates that Google sees the "optimized photo" and requests the full-size photo from iCloud before it adds its compression and uploads. This takes time and bandwidth, but it works just fine.

If you are a Geeks On Tour member, we have a full series of tutorial videos on Google Photos
Chris Guld is President and Teacher-in-Chief at GeeksOnTour.com. She has been in computer training and support since 1983. She is now a Product Expert for the Google Photos Forum, owner of the LearnGooglePhotos.com blog, and author of Learn Google Photos.
She loves to teach! If you want to learn, you’ve come to the right place.

Monday, October 19, 2020

This Blog has moved

LearnGooglePhotos.com

Just click here to go to the new site. All content from this site is included in the new site, then there is new content starting with September 2020. 


Tuesday, August 4, 2020

Learn Google Photos - The Book tl;dr

The book, Learn Google Photos 2020, will be released on September 1. At roughly 150 pages, you might say TL;DR - too long don't read, so we're writing this chapter by chapter summary for you.

More than a book

In addition to the printed book, or eBook, we are also building a companion web page. The first purpose of the page is to keep a running list of updates. Google Photos is changing all the time -- we will keep track. On that page we will also give access to tutorial videos and links to further resources for each chapter. 

Introduction

The introduction focuses on explaining the mission of Google Photos. It is not a better set of tools to manage your photos, it is a paradigm shift in the whole idea of managing your photos. It is one home for your entire lifetime of photos and videos with automated systems to manage them and making it easy to share and explore your best memories. The introduction also lists some frequently asked questions with answers to jump-start your learning.

Chapter 1: Your Google Account

You must have a Google Account to use Google Photos. If you have multiple Google accounts be clear which one is used for your photos. Your username and password provides the lock and key under which your photos and videos will be stored. You get unlimited storage for free if you choose the "High Quality" size setting for your photos and videos. If you want to store them in original quality, you pay a small amount for storage and that makes you a member of Google One.

Chapter 2: Getting Started on Mobile Devices

Google Photos was built because people are taking so many photos and videos with their smartphones. It replaces the built-in gallery or photos app that came with your phone. To gather all the photos and videos from your phone and upload them to your Google account in the cloud, all you need to do is install the app and turn on the Back up & Sync setting. Then watch as the photos from your phone start to collect at Photos.Google.com. As you take new photos and videos, they will also be uploaded to your account. Now you can feel safe that you won't lose your photos even if you lose your phone. 
Once your photos are safely in the cloud, you can free up space on your phone by deleting them there. Other than having more space on your phone, you won't even know they're gone because the Google Photos app displays the cloud copy. But wait! Think about it, once you delete them from the phone, your only copy is in the cloud. You still need a backup. We highly recommend copying your phone's photos and video to one more location before wiping them from the phone.

Chapter 3: Collecting the rest of your life's photos and videos

If the only photos in your life are those you've taken with your phone, then you can skip this chapter. Most of us, however, have lots more. The goal is to gather all the photos and videos from your entire life in the one home that Google provides. If you previously used Picasa, then any photos you uploaded to Picasa Web Albums are already in Google Photos because they use the same cloud servers and Google accounts. For photos in Picasa that you did not upload, they are stored on your computer's hard drive. This chapter teaches how to upload past digital photos from computer hard drives and folders, camera cards, external hard drives, CDs, thumb drives and other cloud services like Facebook or Dropbox or OneDrive. This chapter also teaches some easy techniques for digitizing old prints and slides so they can be collected into your Google Photos. 

Chapter 4: Getting around in Google Photos

Google Photos is actually 3 things: 
  1. Website and cloud storage space (photos.google.com)
  2. Android App
  3. iOS App
This chapter teaches how to navigate the menus and buttons in all three interfaces. We answer the questions, "What does this button do?" For the most part, anything you can do in one, you can also do in the other 2, but there are some minor differences. 

Chapter 5: Exploring your photo library

This chapter explains how your photo library is organized by date. We explain how to use the Archive and Device Folders. There is no need to know exactly where a photo is because you can use search to find most anything. You can browse a map, and see photos in their locations. Want to see all the photos of your grandson? Just look in the People section where Google automatically sorts photos by faces. Learn how to select images for adding to albums, how to delete photos, how to add descriptions and view other information (metadata) for your photos, how to play a slide show, and how to use Google Lens.

Chapter 6: Keeping your memories safe

Doesn't it feel good now to have all your photos and videos in one place? It is indeed wonderful, but if living with technology teaches us anything, it's to have a backup. Don't keep all your memories in only one basket.
  • Be careful with delete! Make sure you understand what you are deleting before you use it. Are you deleting the device copy, the cloud copy, or both? If you do delete by mistake, this chapter teaches how you can undelete if it has been less than 60 days. 
  • Photos and videos stored in your Google account are extremely safe, but as we all know, stuff happens.  This chapter teaches how to copy your photos to one more cloud storage service, just in case. 
Everything is uploaded, you also need to know how to download. 
  • On your phone, sometimes it is necessary to have photos stored locally on the device. You can download individual photos from the cloud to your device. 
  • On your computer, you should download at least your important albums. This chapter teaches how to do that.
  • Google provides a tool called Takeout that will download your entire library of photos and videos. It does it using multiple .zip files however and can be very confusing. It does not preserve your albums.

Chapter 7: Editing to improve your photos

It doesn't matter which device you use, phone, tablet, or computer, you have the tools to make your photos look better. This chapter teaches how to use Crop, Filters, Light and Color options, and Pop. For video, you can rotate, stabilize, trim, and export frame. Snapseed is also covered in this chapter. It is a separate, free app by Google, for more sophisticated editing. It works in partnership with Google Photos. The sample below is using editing features within Google Photos.

Chapter 8: Organizing with Albums and Favorites

This chapter teaches all about making and using albums. Albums are used for all the following reasons:

  1. Showcase your good photos and videos
  2. Collecting your chosen photos in special categories
  3. To tell a story, you can add text blocks and maps.
  4. For sharing groups of pictures
  5. Collaborating with others for a group album
  6. To use for digital photo frames
  7. To use for making printed photo books
  8. To use for making movies or animations
  9. To use for downloading backups
  10. Making a Favorites album by starring photos
  11. Auto updating albums (aka Live Albums)

Chapter 9: Sharing

This chapter covers all the different techniques for sharing photos. Which ones you use depends on who you are sharing with and why. 
  • Using a link you can share one photo or any number of photos and videos with any number of people. They don't even need to have a Google account, anyone with the link can open it and see your photos. 
  • If you want to be more exclusive, you can share with specified individuals if they do have a Google account. 
  • Shared albums are wonderful for allowing groups of people to share with each other. 
  • Shared library is used if you want one partner to have access to your entire library.
  • Sharing to another app is how you send photos via email, text, or post to social media like Facebook or Twitter.

Chapter 10: Surrounding yourself with your photos and creations

Here's where we reap the rewards of having our life's worth of photos and videos in one place. 
  • Memories section: Google encourages us to reminisce by surfacing memories at the top of the mobile apps. In the Recent Highlights segment, you may see creations that Google has made for you. Sweet little movies are compiled from your photos and videos, collages, and animations. 
  • Next in the memories section, you can browse thru photos from this week 1 year ago, 2 years ago, and as far back as your photos go. 
  • Creations: You can make creations easily. Combine any photos and videos into movies, animations, and collages that will put a smile on your face and anyone you share with.
  • Printing: built right in to Google Photos is a Print Store. You can order individual prints if you want, but the real beauty is easy, fast, and inexpensive it is to order photo books and mounted canvas wall prints. 
  • You can have your television displaying your memories like a big screensaver. You can also have slideshows constantly running on smaller screens of smart displays.  Pick whatever albums you want to display on different screens. Your whole house can be filled with your memories being displayed. It can even happen at someone else's house. If you share photos of your kids with your mother, she can have those photos automatically displayed on her TV or smart display.

Chapter 11: Troubleshooting and getting help

If you can't find your photos, or something just isn't working as it is supposed to, there are a few troubleshooting techniques you can use. If that doesn't work, you can get help thru the public support forum. If you are a Google One subscriber, you can get phone help.

Chapter 12: Apple Photos and iCloud vs Google Photos

Apple Photos is the photo gallery or camera roll app that comes with your iPhone and iPad. It is also a more full-featured program that comes with Mac computers.
iCloud is Apple's cloud storage and synchronization service. You can use Apple Photos with or without iCloud. Apple Photos with iCloud performs roughly the same service as Google Photos with one major exception when it comes to deleting photos.
  • with Google Photos you can delete the device copy of a photos and still keep the cloud copy
  • with Apple Photos you cannot. Apple photos job is to keep all your Apple devices in sync. Add a photos with one device, it gets added to all. Delete a photo with one device and it is deleted from all - including the cloud.
  • if you delete photos using Google photos, it is deleting the device copy. That deletion will be noticed by iCloud and the deletion will be synced to iCloud and all Apple devices.
This chapter explains this in more detail and compares some of the features of both apps. We let you know whether it's ok to use both at the same time, or if you should stick to Google Photos and turn iCloud off. 

Chapter 13: My favorite features

To wrap it up, let's get back to remembering what makes Google Photos so great. I list 9 different favorite features:
Chris Guld is President and Teacher-in-Chief at GeeksOnTour.com. She has been in computer training and support since 1983. She is now a Product Expert for the Google Photos Forum, owner of the LearnGooglePhotos.com blog, and author of Mrs. Geek's Guide to Google Photos
She loves to teach! If you want to learn, you’ve come to the right place.

Tuesday, June 30, 2020

Google Photos is 5 Years old and brand new

Google Photos was released in May of 2015, see the launch video here. To celebrate 5 years and over 1 Billion users, Google has given the app a major facelift. First of all, it has a new logo.

 Old icon

 New icon


Simplify, simplify, simplify

What should the app focus on? Based on watching their users, the Google Photos team has decided that reminiscing is the core of the app. With the thousands of photos we all collect in our lifetimes, and our lack of time to manually organize them all, the ability to be reminded of our memories is of great value.

With that in mind, the Google Photos team cut down the main choices (Tabs at the bottom) from 4 to 3, putting Search front and center. Search is so good - that's nothing new - the hope is that seeing the search icon as one of only three tabs, will make people use it.

The Memories section at the top is kind of like Facebook stories. Just enjoy. Click on one and watch a little slide show. Go back thru the years and see photos you forgot you had. New with the redesign is "Recent Highlights." That's where Google picks what it thinks are the best of your recent photos. Just watch and enjoy. You'll also find the old "For You" creations in this memories section. If you're ever bored and in need of some entertainment, try opening up your Google Photos, click on the first tile of the Memories section and just watch. I'll bet you'll like it.


Old app

  1.   3-line menu (aka “Hamburger”) menu
  2.  Search bar
  3.  Chromecast button (only if on a network with Chromecast)
  4. Google Account profile button
  5. Quick scroll button (disappears when not scrolling)
  6. Memories – content of this area will change depending on which tab is selected
  7. Photos – content of this area will change depending on which tab is selected
  8. Tabs


 New app


  1. Sharing – takes you to sharing screen
  2. Chromecast button (only if on a network with Chromecast)
  3. Google Account profile button, find Settings and help here
  4. Quick scroll button (disappears when not scrolling)
  5. Stars represent favorites
  6. Tabs: Photos, Search, Library
  7. Photo Grid – content of this area will change depending on which tab is selected
  8. Memories – only shows at the top of Photos tab

Where did everything go?

If you are accustomed to using the Google Photos app, it is disconcerting at first when you open the new app. There is no 3-line menu at the top left, there is no search bar at the top, no Albums tab, For You, or Sharing. Everything is still there, they've just rearranged the furniture. Here is a grid of where to find the old things using the new app. They've moved a lot of functionality under the new tab at the bottom called "Library." Most anything to do with managing your library of photos is there. The other button where you'll find a lot of the moved furniture is the Account profile button at the top right. Settings, Free up Space, backup status, and Help & Feedback are there.


The New Map View of Photos

There's not a whole lot that's new in this version, mostly just rearranged, but one new thing is pretty spectacular and that's a Map of your memories. Just tap the Search button and right away you'll see a way to "Explore Map."  If you pinch the map, you can see all of North America on one screen with a "heat map" of where you have taken pictures. 

Zoom in on a location and you'll get a split screen with the map on top and a grid of photos/videos on the bottom. You can move the map and the photos will change accordingly, or you can scroll thru the photos and the map will change accordingly. It's very fast, and very cool. Good job Google!

Any questions? Please leave a comment below. Also see our YouTube show where we went thru all the changes: Episode 194 What's new with Google Photos.


Chris Guld is President and Teacher-in-Chief at GeeksOnTour.com. She has been in computer training and support since 1983. She is now a Product Expert for the Google Photos Forum, owner of the LearnGooglePhotos.com blog, and author of Mrs. Geek's Guide to Google Photos
She loves to teach! If you want to learn, you’ve come to the right place.

Friday, June 19, 2020

Google Photos can stabilize videos

I hope you've discovered that your smartphone camera takes great videos, and videos add so much to the experience of your memories. Even just 15 second clips, combined with your photos, can bring your memories to life in delightful ways. But, any time you are hand-holding your phone while taking video, you run the risk of it coming out shaky.

If you are using an Android device and the Google Photos app, you're in luck. There's a simple, one-click option to "stabilize" your video. Just open the video and tap on the edit button below the video - the middle icon. Edit That will open up the video editing tools.


All you need to do is tap the button at the left called stabilize, and Google Photos will do all the rest. Notice that you also have the option to trim the beginning or end, and to rotate the video. When you're done, tap Save a Copy in the upper right. Note: this feature does not exist on the iPhone version of Google Photos. I hear that the app Emulsio is supposed to do the same thing.

The results


The results of using the Stabilize function with Google Photos app on Android

Chris Guld is President and Teacher-in-Chief at GeeksOnTour.com. She has been in computer training and support since 1983. She is now a Product Expert for the Google Photos Forum, owner of the LearnGooglePhotos.com blog, and author of Mrs. Geek's Guide to Google Photos
She loves to teach! If you want to learn, you’ve come to the right place.

Thursday, June 4, 2020

How Google Photos can Scan a QR Code

I'm sure you've all been asked to scan a QR code, like the one at the right, at some point in time. That's how you can get a discount coupon at a store, or get more information about a product from a print ad, or make an appointment at a hair salon, or get directions to a restaurant, or listen to a guided tour at a public garden. There are so many uses for QR codes. If you scan this particular code, it will take you to YouTube and a playlist of 25 Google Photos tips.

All iPhones and many Android phones can now scan these codes with just the camera that came built in with the phone. Simply open the camera app and focus on the code, you will see a link pop up that will lead you to where the code goes. 

But, what if you see a QR code that you want to keep and scan later? For example, you're in the Florida Welcome Center and there are posters everywhere about the things to see and do in Florida. Most of them will have a QR code you can scan for more information. You want to do that at your leisure after dinner.

You can take a picture of it, sure, but then how do you scan it from the photo? If you use Google Photos, it's a piece of cake. Just use the Lens button. Open the photo using Google Photos and you'll see the Lens button  third from the left. Tap that and it will go to work scanning the code and then pop up a link to tap to take you there.  


Chris Guld is President and Teacher-in-Chief at GeeksOnTour.com. She has been in computer training and support since 1983. She is now a Product Expert for the Google Photos Forum, owner of the LearnGooglePhotos.com blog, and author of Mrs. Geek's Guide to Google Photos
She loves to teach! If you want to learn, you’ve come to the right place.

Sunday, May 31, 2020

Show your Google Photos like a screensaver on your TV


We no longer turn our TVs off except for overnight. The rest of the time, if we're not watching a show, they are displaying our chosen Google Photos albums. We just love that our house is filled with our travel photos, especially in this time of the CoronaVirus when we're stuck at home.

What you need

You don't need a fancy TV, any TV with an HDMI port will do. 
The Chromecast device
costs about $35
  1. Good household WiFi
  2. Chromecast device ($35) plugged into HDMI port of any TV
  3. Google Photos Account
  4. Google Home app

How to set it up

When you bring your Chromecast device home from the store you just plug it into an HDMI port on your TV. You will also plug in the other cable into the TV's USB port, or use the electric plug to plug it into a wall outlet. The Chromecast device needs to get power either from the USB or from the wall outlet. 
Google Home is a free app for Apple or Android
  • Once you have it plugged in and the TV turned on, you will see onscreen instructions.
  • Both the TV/Chromecast device and your phone with the Google Home app must be connected to the same WiFi network.
  • Once you've completed the onscreen instructions, you should see your TV listed in your Google Home App, let's say you named it "Living Room TV"
  • Select "Living Room TV" in your Google Home app on the phone, and then tap on "Personalize Ambient"
  • On the Ambient mode screen choose Google Photos, then select whatever albums you want used as your 'screensaver.'
If you have an Android phone, you can also open the Google Photos app, tap the 3-line menu, and choose Photo Frames. Choose "Living Room TV." Whatever albums you select here will be displayed on the TV whenever it is set to the proper HDMI port and nothing else is being cast.


Chris Guld is President and Teacher-in-Chief at GeeksOnTour.com. She has been in computer training and support since 1983. She is now a Product Expert for the Google Photos Forum, owner of the LearnGooglePhotos.com blog, and author of Mrs. Geek's Guide to Google Photos
She loves to teach! If you want to learn, you’ve come to the right place.

Monday, April 20, 2020

Ten ways of using albums in Google Photos

If you're not making albums, you're not using the capabilities of Google Photos. It's by adding photos to albums that you can make your own groupings. Realize that Albums are NOT like folders, they do not store your photos. Photos are stored in one bucket, just called Google Photos. Any given photo can show up in one or more albums, they’re just marked to display in that album. If you delete a photo from Google Photos – it’s gone from the album. If you remove a photo from an album, it’s still in Google Photos. To make an album:
  • Select the photos you want in the album
  • Click/tap the + in the upper right corner
  • Choose Album
  • Give the album a name and click/tap the checkmark at top left
If you have pictures from your visit to New England to see lighthouses, you could have one album called New England vacation, that shows your travels along with lots of lighthouse pictures. If you have also been to many other locations to see lighthouses, you might want to make an album called lighthouses that spotlights your best lighthouse photos. One picture of the lighthouse on the cliff in Acadia can show up in both albums.

  1. Showcase your good photos and videos.
  2. Collect your special categories that you want to show in an instant. 
  3. Tell a story, complete with text blocks and maps. See our 2017 Italy album, or Geek's story
  4. Share groups of photos easily
  5. Collaborate with groups of people such as everyone on a trip
  6. Use for digital photo frames
  7. Use for making books
  8. Use for making movies
  9. Use for downloading backups
  10. Auto updating albums aka Live Albums. Think photo frame at Grandma's house auto adding photos of of grandkids
In this YouTube show we discuss these different options.


Chris Guld is President and Teacher-in-Chief at GeeksOnTour.com. She has been in computer training and support since 1983. She is now a Product Expert for the Google Photos Forum, owner of the LearnGooglePhotos.com blog, and author of Mrs. Geek's Guide to Google Photos
She loves to teach! If you want to learn, you’ve come to the right place.

Saturday, March 7, 2020

If I get free, unlimited storage, why is Google Photos telling me to buy storage for $1.99/mo?

It may look like Google is telling you to buy 100 GB for $1.99/mo, but what they're actually doing is just offering it to you.

If you choose the High Quality setting, you do get free unlimited storage, you don't need to buy anything.

High Quality means that Google stores up to 16 megapixel photos and 1080p videos with an extra compression to reduce the file size. My cameras all take photos less than 16 megapixels, so this is fine with me and I like the reduced file size. 

Your Google Storage Allotment

Google gives everyone 15GB of free storage space. Keep in mind that your Google storage is shared among Gmail, Google Drive, and Original quality Google Photos. You can see how much you are using by going to MyAccount.Google.com and be logged in with your Google account. 
You will see sections for privacy, security, and Account storage. In the account storage section, click the link to "Manage storage" and you will see your total allotment as well as the amount being used by Drive, Gmail, and Photos.

What is Google One? Think phone support.

If you choose to buy 100 GB for $1.99/month, you become a member of Google One. That is simply what Google has chosen to call it when you pay for storage rather than just using the free allotment. 

If you become a member of Google One, there are a few other benefits. You get support from Google, even for the free products like Google Photos. Think about that, for $2/month you get phone support. You can talk to a real human being. I've heard reports ranging from "solved my problem quickly" to "totally useless." But, that is the nature of phone support in general, right? I think it's pretty amazing to get phone support for $2/mo.

My Google Photos setting changed to Original

When you become a Google One member, Google apparently assumes you want to use that storage for your photos and the default selection for file size changes from High Quality to Original. It took me a while to realize this. I've always chosen to store my photos in High Quality. I am now paying $2/mo for the Google One membership, but my reason is to have access to phone support. I don't know how long I will continue the membership and I still want my photos to be stored for free with the High Quality setting. My current storage stats show that Google Photos is taking up 2.81 GB.

I found the culprit by checking my iPhone Google Photos settings. I had uninstalled and reinstalled the program, not noticing that the default size setting had changed to Original. I have now set it back to High Quality, but what about the photos that are already stored at High Quality?

Recover Storage

There is a button that will review all your stored photos and, retroactively, compress them to High Quality. It's called Recover Storage, and you'll find it on the Google Photos settings on the web version. Here is a video on how to use it.


Billed thru iTunes?

When someone showed me an email that iTunes was billing them for Google Photos storage, I thought it was a scam. Google storage would be billed thru Google. Since when was Apple doing Google's collections for them?!? But, apparently it is true. You can sign up for that $2mo 100 GB using your iPhone and your Apple ID.
If you think an email about an iTunes charge may be a scam, here is Apple's help for identifying legitimate emails from them.


Chris Guld is President and Teacher-in-Chief at GeeksOnTour.com. She has been in computer training and support since 1983. She is now a Product Expert for the Google Photos Forum, owner of the LearnGooglePhotos.com blog, and author of Mrs. Geek's Guide to Google Photos
She loves to teach! If you want to learn, you’ve come to the right place.

Wednesday, February 26, 2020

How to add text with a solid background to a photo using Google Photos - 610

It was a long time in coming, but Google Photos now can add text right to a photo. At least, the Android version of Google Photos can do that. It's called the "Markup" tool and it's pretty simple.

Even if you know how to add text to photos with Google Photos, yuo should watch this short video because I add a very important little tip!

Notice how the words in the picture  have a dark background. That is SO important to allow the words to be readable. I've found a way to accomplish it with the new Google Photos markup tool.


Chris Guld is President and Teacher-in-Chief at GeeksOnTour.com. She has been in computer training and support since 1983. She is now a Product Expert for the Google Photos Forum, owner of the LearnGooglePhotos.com blog, and author of Mrs. Geek's Guide to Google Photos
She loves to teach! If you want to learn, you’ve come to the right place.

Saturday, February 8, 2020

Using Google Lens to identify items in a photo

When you open any photo in Google Photos, you will see a button at the bottom meant to look like a camera lens. That is Google Lens and it is amazing. Open any photo, using Google Photos, and tap that button - it will analyze the current photo and tell you all sorts of things! Identify flowers, birds, insects. Translate and copy text, scan QR codes, identify products and give you links to buy them. And much more.


Google Lens Examples

The following are photos in my Google Photos. When I tap on the lens button, it analyzes the photos and gives me remarkable results.


Lens will tell you the name of this Arch in Utah

Lens will identify these birds

Lens will translate this billboard

Lens can copy the text from this certificate, making it editable in a document
Lens can scan this business card and dial the phone number, send an email, or even add to your contacts

Lens can identify the type of this turtle.

Lens can identify this book and give you a link to buy it.

Lens can scan this QR code and give you the link to watch the video.

Lens will identify this product and give you links where you can buy it


Our YouTube show, episode 184, demonstrates how to use Google Lens


Chris Guld is President and Teacher-in-Chief at GeeksOnTour.com. She has been in computer training and support since 1983. She is now a Product Expert for the Google Photos Forum, owner of the LearnGooglePhotos.com blog, and author of Mrs. Geek's Guide to Google Photos
She loves to teach! If you want to learn, you’ve come to the right place.

Thursday, January 9, 2020

Google Photos: How to share photos with a link, and not get a 404 error

There are several ways to share photos using Google Photos.
  1. Direct sharing with other Google Photos users
  2. Mobile only: Share to ... an app (this copies photo(s) and opens them up in the designated app. 
  3. Copy Link

How to share with a link, and make sure it's the right link

When I need to share with someone who doesn't use Google Photos, I like to use the share with link technique. I copy the link from Google Photos, then I paste it wherever my recipient is sure to see it, an email addressed to them, a text message, a Facebook post etc. Anyone who has the link can see the picture(s) represented by that link.

As long as it's the right link! You need to follow the proper steps, not just grab a link with the right-click/copy link method, or copying from the address bar. If you do grab the link with either of those two generic methods it will start with Photos.Google.com/photo/.... That is a link to your photo library and only you will be able to see it. Anyone you send it to will just see a 404:that's an error. The correct link should start with photos.app.goo.gl/...
Here's how you get the right link:

Wednesday, January 8, 2020

Google Photos updates in 2019: Faster, Better, Changes, and New Features

Google is changing and improving Google Photos all the time. Since the 2d edition of the book was published in June of 2018, I have been keeping a list of all the changes.

You are updating your Google Photos app aren't you? 

If you're not sure, here's a video on How to Update Google Photos.

Here are my picks for the most significant recent updates.

Monday, December 30, 2019

If you take pictures of receipts, you'll like the Crop Document feature in Google Photos

This is a relatively new feature in Google Photos (Oct 2018), and it's only available on the Android version. If you took a photo of a receipt, a business card, or a full page document, it looks better if you crop the background out, and adjust the skew of the photo.
  1. Open the photo and tap the edit button Edit
  2. Now tap the last button on the right, the 9-dot grid
  3. You should see "Crop Document" at the top, tap that
  4. Try tapping the "Auto" button at the bottom, it should crop to the edges of the document
  5. If auto didn't do enough, you can drag any of the 4 corners into position manually
  6. Tap Done, then Save


Chris Guld is President and Teacher-in-Chief at GeeksOnTour.com. She has been in computer training and support since 1983. She is now a Product Expert for the Google Photos Forum, owner of the LearnGooglePhotos.com blog, and author of Mrs. Geek's Guide to Google Photos
She loves to teach! If you want to learn, you’ve come to the right place.

Google Photos can capture one frame from a live or motion photo

If you use the iPhone feature called Live photos or the Android motion photo, you know that you get a few seconds of video along with your photo. Now Google Photos allows you to see that video portion frame by frame and pick the best frame to be a new still photo.

Instead of taking burst shots of your grandson playing basketball, you can just take one shot - a motion shot - then pick the frame where the ball goes through the hoop!

This is great for photos of people where they may be caught blinking, and their eyes closed. You can find a frame from the video portion where all eyes are open.

This video starts by showing you how to take a live photo in iOS or motion photo in Samsung, then shows how to pick the desired frame:

Google Photos movie maker needs more features

I love the Google Photos movie maker, but it is missing some vital features.

What is Google Photos Movie Maker?

 If you take lots of photos and videos, you need better ways of combining, presenting and sharing them. Have you tried the movie feature in Google Photos? There is no easier way of making a movie out of your photos and video clips than using Google Photos Movie Maker capabilities. Sometimes Google Photos even makes a movie for you and gives it to you in the For You section. No work at all! Even when you make the movie yourself, it is drop-dead easy. On your mobile device, select the photos and videos you want included, tap the + button in upper right and choose movie, then you can save, or make a few edits.
Here's a video to show you how:

Tuesday, December 10, 2019

Google Photos and Manual Face-tagging

People love the fact that Google Photos groups photos together by faces in the People section. And, they hate it when it doesn't get the people right. Now you can fix this with the Edit People option.

This new feature is available on all 3 platforms: computer/web, Android, and iOS.

Every picture has an info panel. On the computer/web version you click the i for info and it opens up the panel to the right. On mobile, you just swipe up on the picture to reveal the info panel. 
One section of the info panel is the People or Pets that are found in the photo. In this photo it notice 2 people but not the third.

Friday, December 6, 2019

They moved it! Using Google Photos and choosing to edit in Snapseed is still there.

Using Snapseed to edit photos
Snapseed is my favorite way to edit photos on my phone. It's a free app from Google that you need to download and install on your phone. It's available for both iOS and Android. Once it's installed, you can use it with any photo in Google Photos.
The way to access it from Google Photos has recently changed, here's how to get there now.
On iPhone, swipe up on the photo and you'll see "Open in Snapseed" as an option below the photo
On Android, open the photo, tap the edit button, tap the 9-dot grid, then you'll see Snapseed as an option.

How to get to Snapseed from Google Photos on Android


GeeksOnTour.com has a Learning Guide for Snapseed for members. Snapseed: Getting started with photo editing
Coming soon - a new course on Snapseed.


Chris Guld is President and Teacher-in-Chief at GeeksOnTour.com. She has been in computer training and support since 1983. She is now a Product Expert for the Google Photos Forum, owner of the LearnGooglePhotos.com blog, and author of Mrs. Geek's Guide to Google Photos
She loves to teach! If you want to learn, you’ve come to the right place.

Using Google Photos you can now share photos with a conversation just like texting

Direct Sharing

Have you ever shared a picture using Google Photos and the recipient says they never got it? Did they tell you to send it in a text message instead because they like how a text message keeps a running conversation along with the pictures?
If so, you'll love this new feature in Google Photos - it makes sharing any photo(s) from Google Photos act just like text messaging. It's rolling out now on iOS, Android and Web! 
  • Select your photo(s)
  • Tap the share button or 
  • Find your friend's icon in your contact list and select them (or you can create a group)
  • Type a message (optional)
  • Tap Send
  • You should see a scrolling conversation with your photos and your text as well as any responses from your recipient. It looks just like a text message. If you don't see this, then your device has not yet received the feature.
The first time you send a photo to a person, that person will receive an email notification as well as a push notification (pop up on your screen) from Google Photos. After the first time, they will only receive the push notification. 

Only works with Google Photos users

You can use this method to share photos with someone not in your contact list by tapping the Search button entering their email address or phone number. This will only work if Google finds a google account using that phone number or email. If it does find someone, you can select them and continue. If it doesn't find a Google account with that address, then you can't use this method. After tapping the share button choose "Share to apps" instead and select your email or texting app.

Use this saved conversation next time

The photos sent between you and this recipient are still collected in a shared album, just like before the change. So, next time you want to send a photo, instead of selecting the photo and tapping the share button, you can tap on your sharing section and find the album shared between the two of you and tap the Add to album Add to album button.
 For more info, read  announcement here. or  Help Center article

Sharing with a Link

This is still my preferred way of sending photos to someone when I don't know if they use Google Photos, or what messaging app they use. When you select photo(s), click the Share button and you should see an option to "Create Link" (on iOS, you need to tap on "Share To:" before you see Create Link.)  Once you have a link created, you'll see the message "Link Copied, you can share it in an app." Now you can go to any app you'd like, email, text, WhatsApp, Facebook, anything, and paste that link. Any recipient will be able to click the link and see the photos.  Don't know how to 'paste?" Here's a video
I keep a running list of all the Google Photos updates I notice. You can see my list by visiting GeeksOnTour.com/google-photos and click on the heading for Google Photos updates. 

Chris Guld is President and Teacher-in-Chief at GeeksOnTour.com. She has been in computer training and support since 1983. She is now a Product Expert for the Google Photos Forum, owner of the LearnGooglePhotos.com blog, and author of Mrs. Geek's Guide to Google Photos
She loves to teach! If you want to learn, you’ve come to the right place.